By: Team T09-1 Since: Aug 2018 Licence: MIT
- 1. Setting up
- 2. Design
- 3. Implementation
- 4. Documentation
- 5. Testing
- 6. Dev Ops
- Appendix A: Product Scope
- Appendix B: User Stories
- Appendix C: Use cases
- C.1. Create a contact
- C.2. List contacts
- C.3. Update a contact
- C.4. Select a contact
- C.5. Delete a contact
- C.6. Create a task
- C.7. List tasks
- C.8. Edit a task
- C.9. Select a task
- C.10. Delete a task
- C.11. Batch delete tasks
- C.12. Delete all tasks
- C.13. Assign people to a task
- C.14. Unassign person from a task
- C.15. View calendar
- C.16. List calendars
- C.17. Import calendar
- C.18. Share calendar
- Appendix D: Non-Functional Requirements
- Appendix E: Glossary
- Appendix F: Product survey
- Appendix G: Instructions for Manual Testing
1. Setting up
1.1. Prerequisites
-
JDK
9or laterJDK 10on Windows will fail to run tests in headless mode due to a JavaFX bug. Windows developers are highly recommended to use JDK9. -
IntelliJ IDE
IntelliJ by default has Gradle and JavaFx plugins installed.
Do not disable them. If you have disabled them, go toFile>Settings>Pluginsto re-enable them.
1.2. Setting up the project in your computer
-
Fork this repo, and clone the fork to your computer
-
Open IntelliJ (if you are not in the welcome screen, click
File>Close Projectto close the existing project dialog first) -
Set up the correct JDK version for Gradle
-
Click
Configure>Project Defaults>Project Structure -
Click
New…and find the directory of the JDK
-
-
Click
Import Project -
Locate the
build.gradlefile and select it. ClickOK -
Click
Open as Project -
Click
OKto accept the default settings -
Open a console and run the command
gradlew processResources(Mac/Linux:./gradlew processResources). It should finish with theBUILD SUCCESSFULmessage.
This will generate all resources required by the application and tests. -
Open
XmlAdaptedPerson.javaandMainWindow.javaand check for any code errors-
Due to an ongoing issue with some of the newer versions of IntelliJ, code errors may be detected even if the project can be built and run successfully
-
To resolve this, place your cursor over any of the code section highlighted in red. Press ALT+ENTER, and select
Add '--add-modules=…' to module compiler optionsfor each error
-
-
Repeat this for the test folder as well (e.g. check
XmlUtilTest.javaandHelpWindowTest.javafor code errors, and if so, resolve it the same way)
1.3. Verifying the setup
-
Run the
seedu.address.MainAppand try a few commands -
Run the tests to ensure they all pass.
1.4. Configurations to do before writing code
1.4.1. Configuring the coding style
This project follows oss-generic coding standards. IntelliJ’s default style is mostly compliant with ours but it uses a different import order from ours. To rectify,
-
Go to
File>Settings…(Windows/Linux), orIntelliJ IDEA>Preferences…(macOS) -
Select
Editor>Code Style>Java -
Click on the
Importstab to set the order-
For
Class count to use import with '*'andNames count to use static import with '*': Set to999to prevent IntelliJ from contracting the import statements -
For
Import Layout: The order isimport static all other imports,import java.*,import javax.*,import org.*,import com.*,import all other imports. Add a<blank line>between eachimport
-
Optionally, you can follow the UsingCheckstyle.adoc document to configure IntelliJ to check style-compliance as you write code.
1.4.2. Setting up CI
Set up Travis to perform Continuous Integration (CI) for your fork. See UsingTravis.adoc to learn how to set it up.
After setting up Travis, you can optionally set up coverage reporting for your team fork (see UsingCoveralls.adoc).
| Coverage reporting could be useful for a team repository that hosts the final version but it is not that useful for your personal fork. |
Optionally, you can set up AppVeyor as a second CI (see UsingAppVeyor.adoc).
| Having both Travis and AppVeyor ensures your App works on both Unix-based platforms and Windows-based platforms (Travis is Unix-based and AppVeyor is Windows-based) |
2. Design
2.1. Architecture
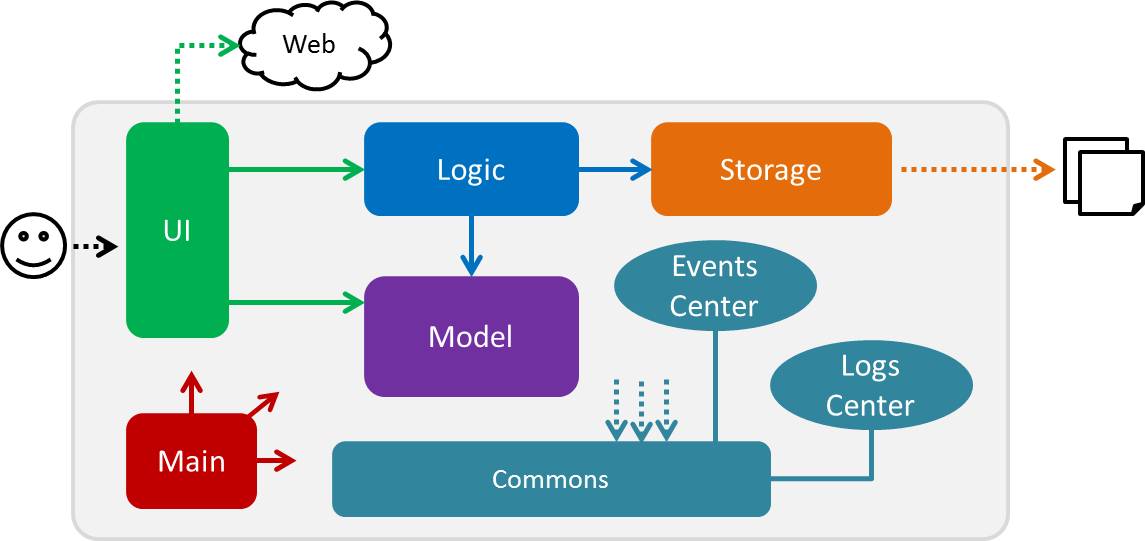
The Architecture Diagram given above explains the high-level design of the App. Given below is a quick overview of each component.
The .pptx files used to create diagrams in this document can be found in the diagrams folder. To update a diagram, modify the diagram in the pptx file, select the objects of the diagram, and choose Save as picture.
|
Main has only one class called MainApp. It is responsible for,
-
At app launch: Initializes the components in the correct sequence, and connects them up with each other.
-
At shut down: Shuts down the components and invokes cleanup method where necessary.
Commons represents a collection of classes used by multiple other components. Two of those classes play important roles at the architecture level.
-
EventsCenter: This class (written using Google’s Event Bus library) is used by components to communicate with other components using events (i.e. a form of Event Driven design) -
LogsCenter: Used by many classes to write log messages to the App’s log file.
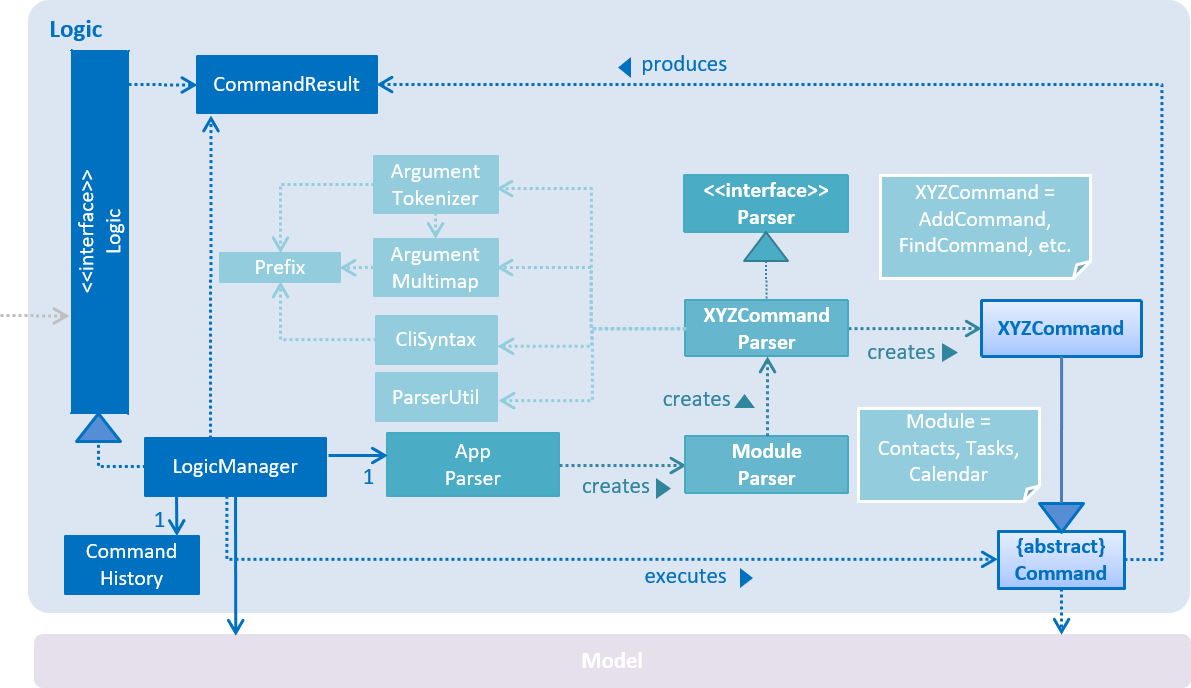
The rest of the App consists of four components.
Each of the four components
-
Defines its API in an
interfacewith the same name as the Component. -
Exposes its functionality using a
{Component Name}Managerclass.
For example, the Logic component (see the class diagram given below) defines it’s API in the Logic.java interface and exposes its functionality using the LogicManager.java class.
Events-Driven nature of the design
The Sequence Diagram below shows how the components interact for the scenario where the user issues the command delete 1.
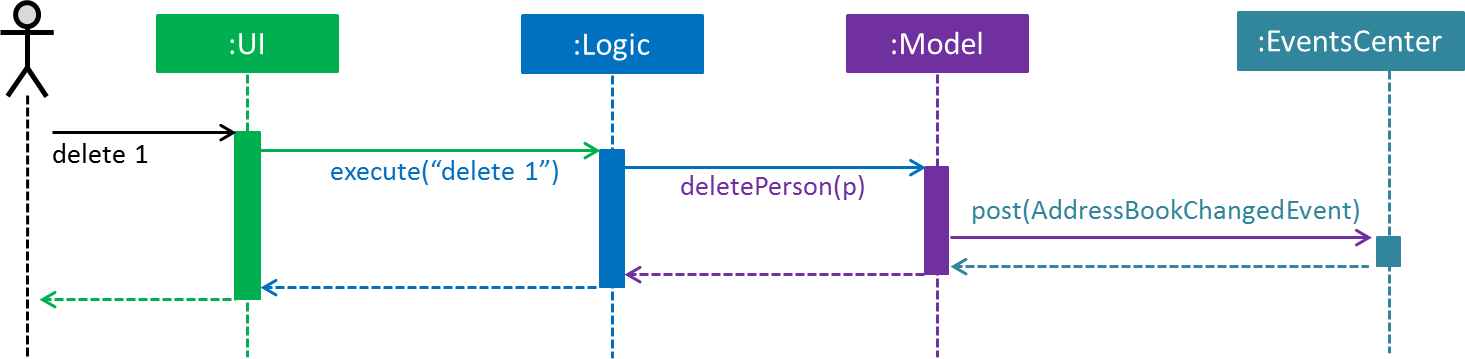
delete 1 command (part 1)
Note how the Model simply raises a AddressBookChangedEvent when the Address Book data are changed, instead of asking the Storage to save the updates to the hard disk.
|
The diagram below shows how the EventsCenter reacts to that event, which eventually results in the updates being saved to the hard disk and the status bar of the UI being updated to reflect the 'Last Updated' time.
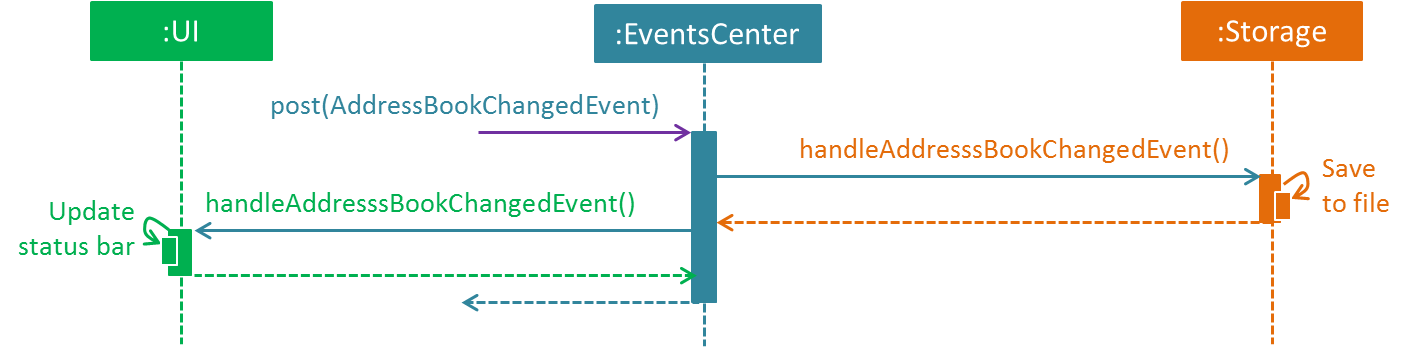
delete 1 command (part 2)
Note how the event is propagated through the EventsCenter to the Storage and UI without Model having to be coupled to either of them. This is an example of how this Event Driven approach helps us reduce direct coupling between components.
|
The sections below give more details of each component.
2.2. UI component
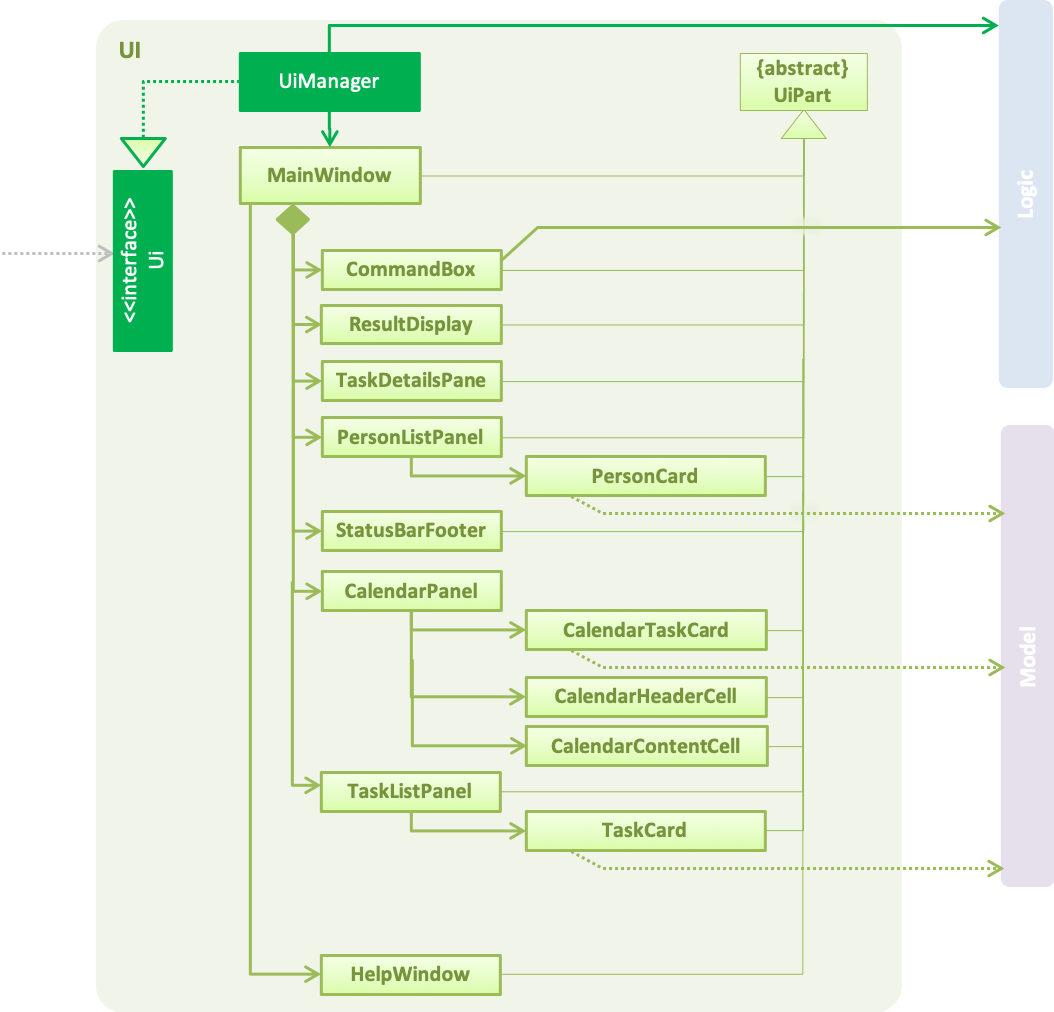
API : Ui.java
The UI consists of a MainWindow that is made up of parts e.g.CommandBox, ResultDisplay, PersonListPanel, StatusBarFooter, etc. All these, including the MainWindow, inherit from the abstract UiPart class.
The UI component uses JavaFx UI framework. The layout of these UI parts are defined in matching .fxml files that are in the src/main/resources/view folder. For example, the layout of the MainWindow is specified in MainWindow.fxml
Additionally, the CalendarPanel consists of CalendarHeaderCell to indicate days of week, CalendarContentCell to indicate the date, and CalendarTaskCard for each of the tasks that falls on that date
The UI component,
-
Executes user commands using the
Logiccomponent. -
Binds itself to some data in the
Modelso that the UI can auto-update when data in theModelchange. -
Responds to events raised from various parts of the App and updates the UI accordingly.
2.3. Logic component
API :
Logic.java
-
Logicuses theAppParserclass to parse the user command. -
AppParserthen sends the command to the appropriate module parser. -
This results in a
Commandobject which is executed by theLogicManager. -
The command execution can affect the
Model(e.g. adding a person) and/or raise events. -
The result of the command execution is encapsulated as a
CommandResultobject which is passed back to theUi.
Given below is the Sequence Diagram for interactions within the Logic component for the execute("contacts delete 1") API call.
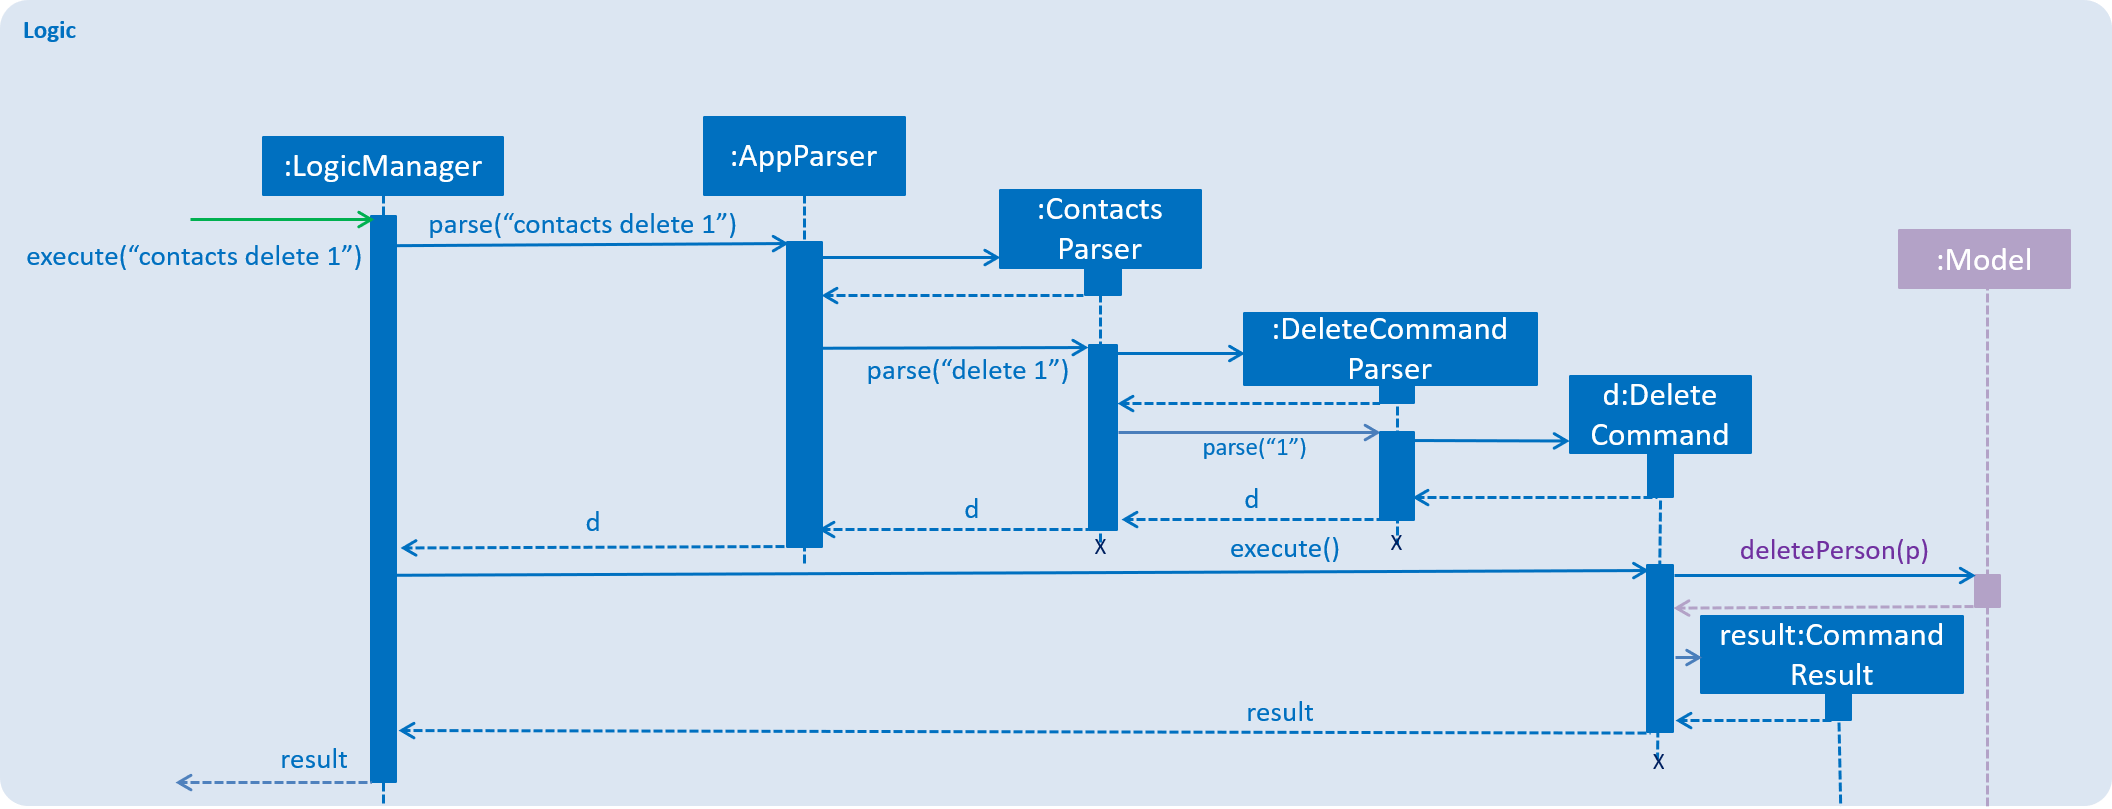
contacts delete 1 Command2.4. Model component
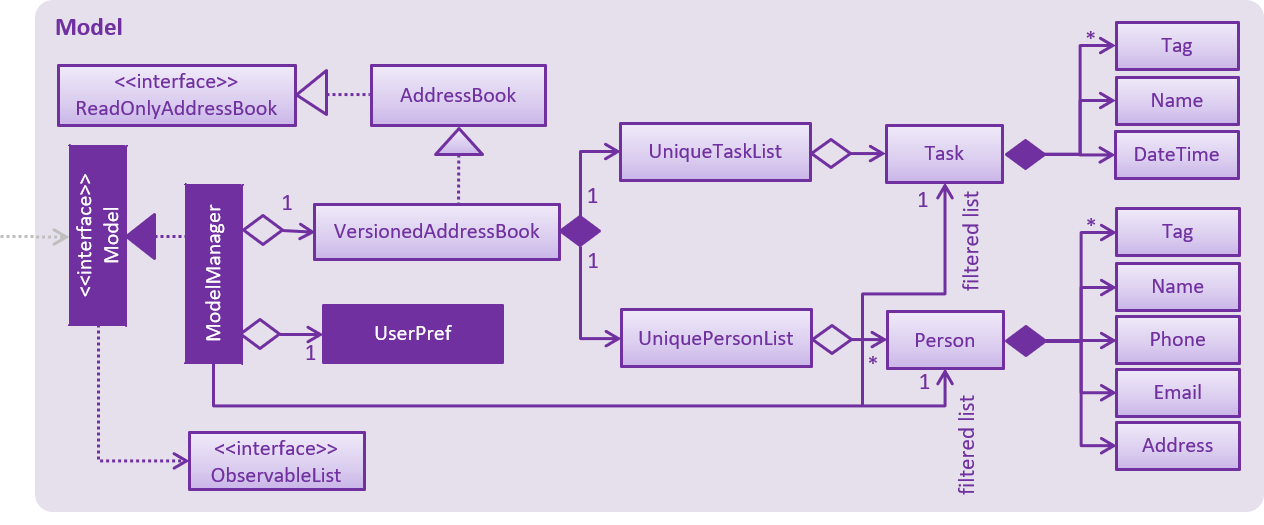
API : Model.java
The Model,
-
stores a
UserPrefobject that represents the user’s preferences. -
stores Person and Task data.
-
exposes an unmodifiable
ObservableList<Person>andObservableList<Task>that can be 'observed' e.g. the UI can be bound to this list so that the UI automatically updates when the data in the list change. -
does not depend on any of the other three components.
2.5. Storage component
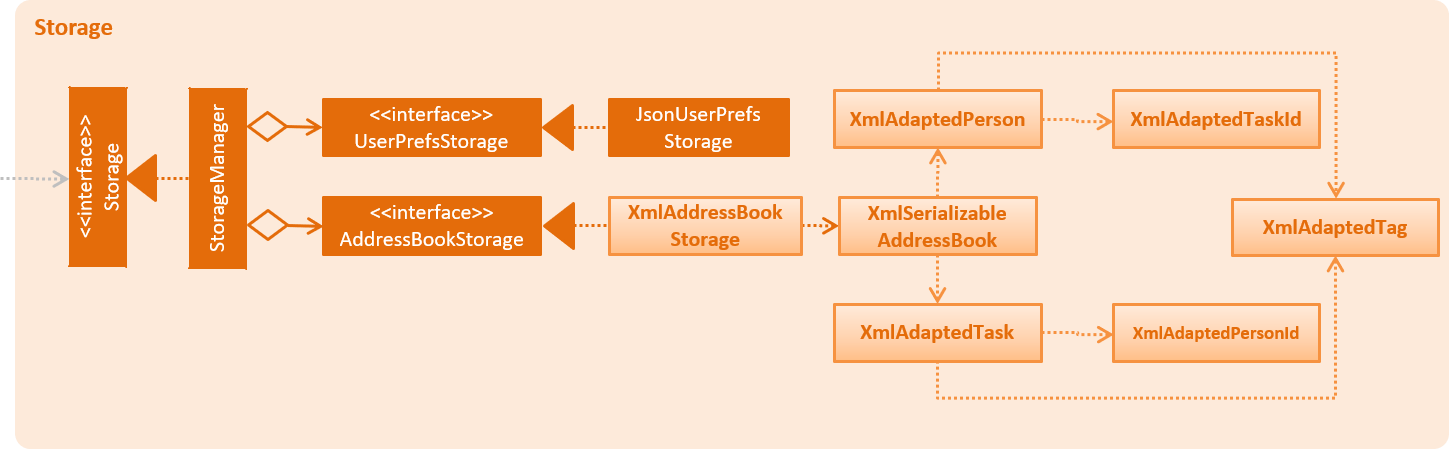
API : Storage.java
The Storage component,
-
can save
UserPrefobjects in json format and read it back. -
can save the Address Book data in xml format and read it back.
XmlAdaptedPerson depends on XmlAdaptedTaskId to keep track of tasks assigned to the person.XmlAdaptedTask depends on XmlAdaptedPersonId to keep track of persons assigned to the task.
|
2.6. Common classes
Classes used by multiple components are in the seedu.addressbook.commons package.
3. Implementation
This section describes some noteworthy details on how certain features are implemented.
3.1. Task class
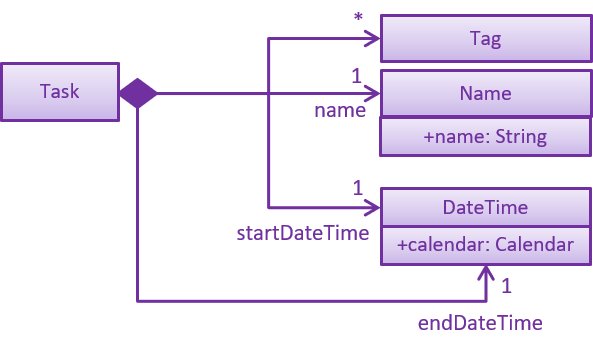
The Task class consists of list of Tag objects and a Name object, corresponding to the same classes in the Person namespace. It also has two DateTime objects, one for the start date and time and the other for the end date and time of the task.
The DateTime class encapsulates a Java Calendar object to store a date and time. It also includes methods to parse and validate date/time inputs from the user, and methods to return the date or time as a String.
3.2. Addition of tasks
Adding a task is fairly straightforward. The user command is given to the parser, which validates the input and creates the task and the objects it is associated with. One aspect with a more involved implementation is the accomodation of optional start date and time fields in the user input, which is illustrated here.
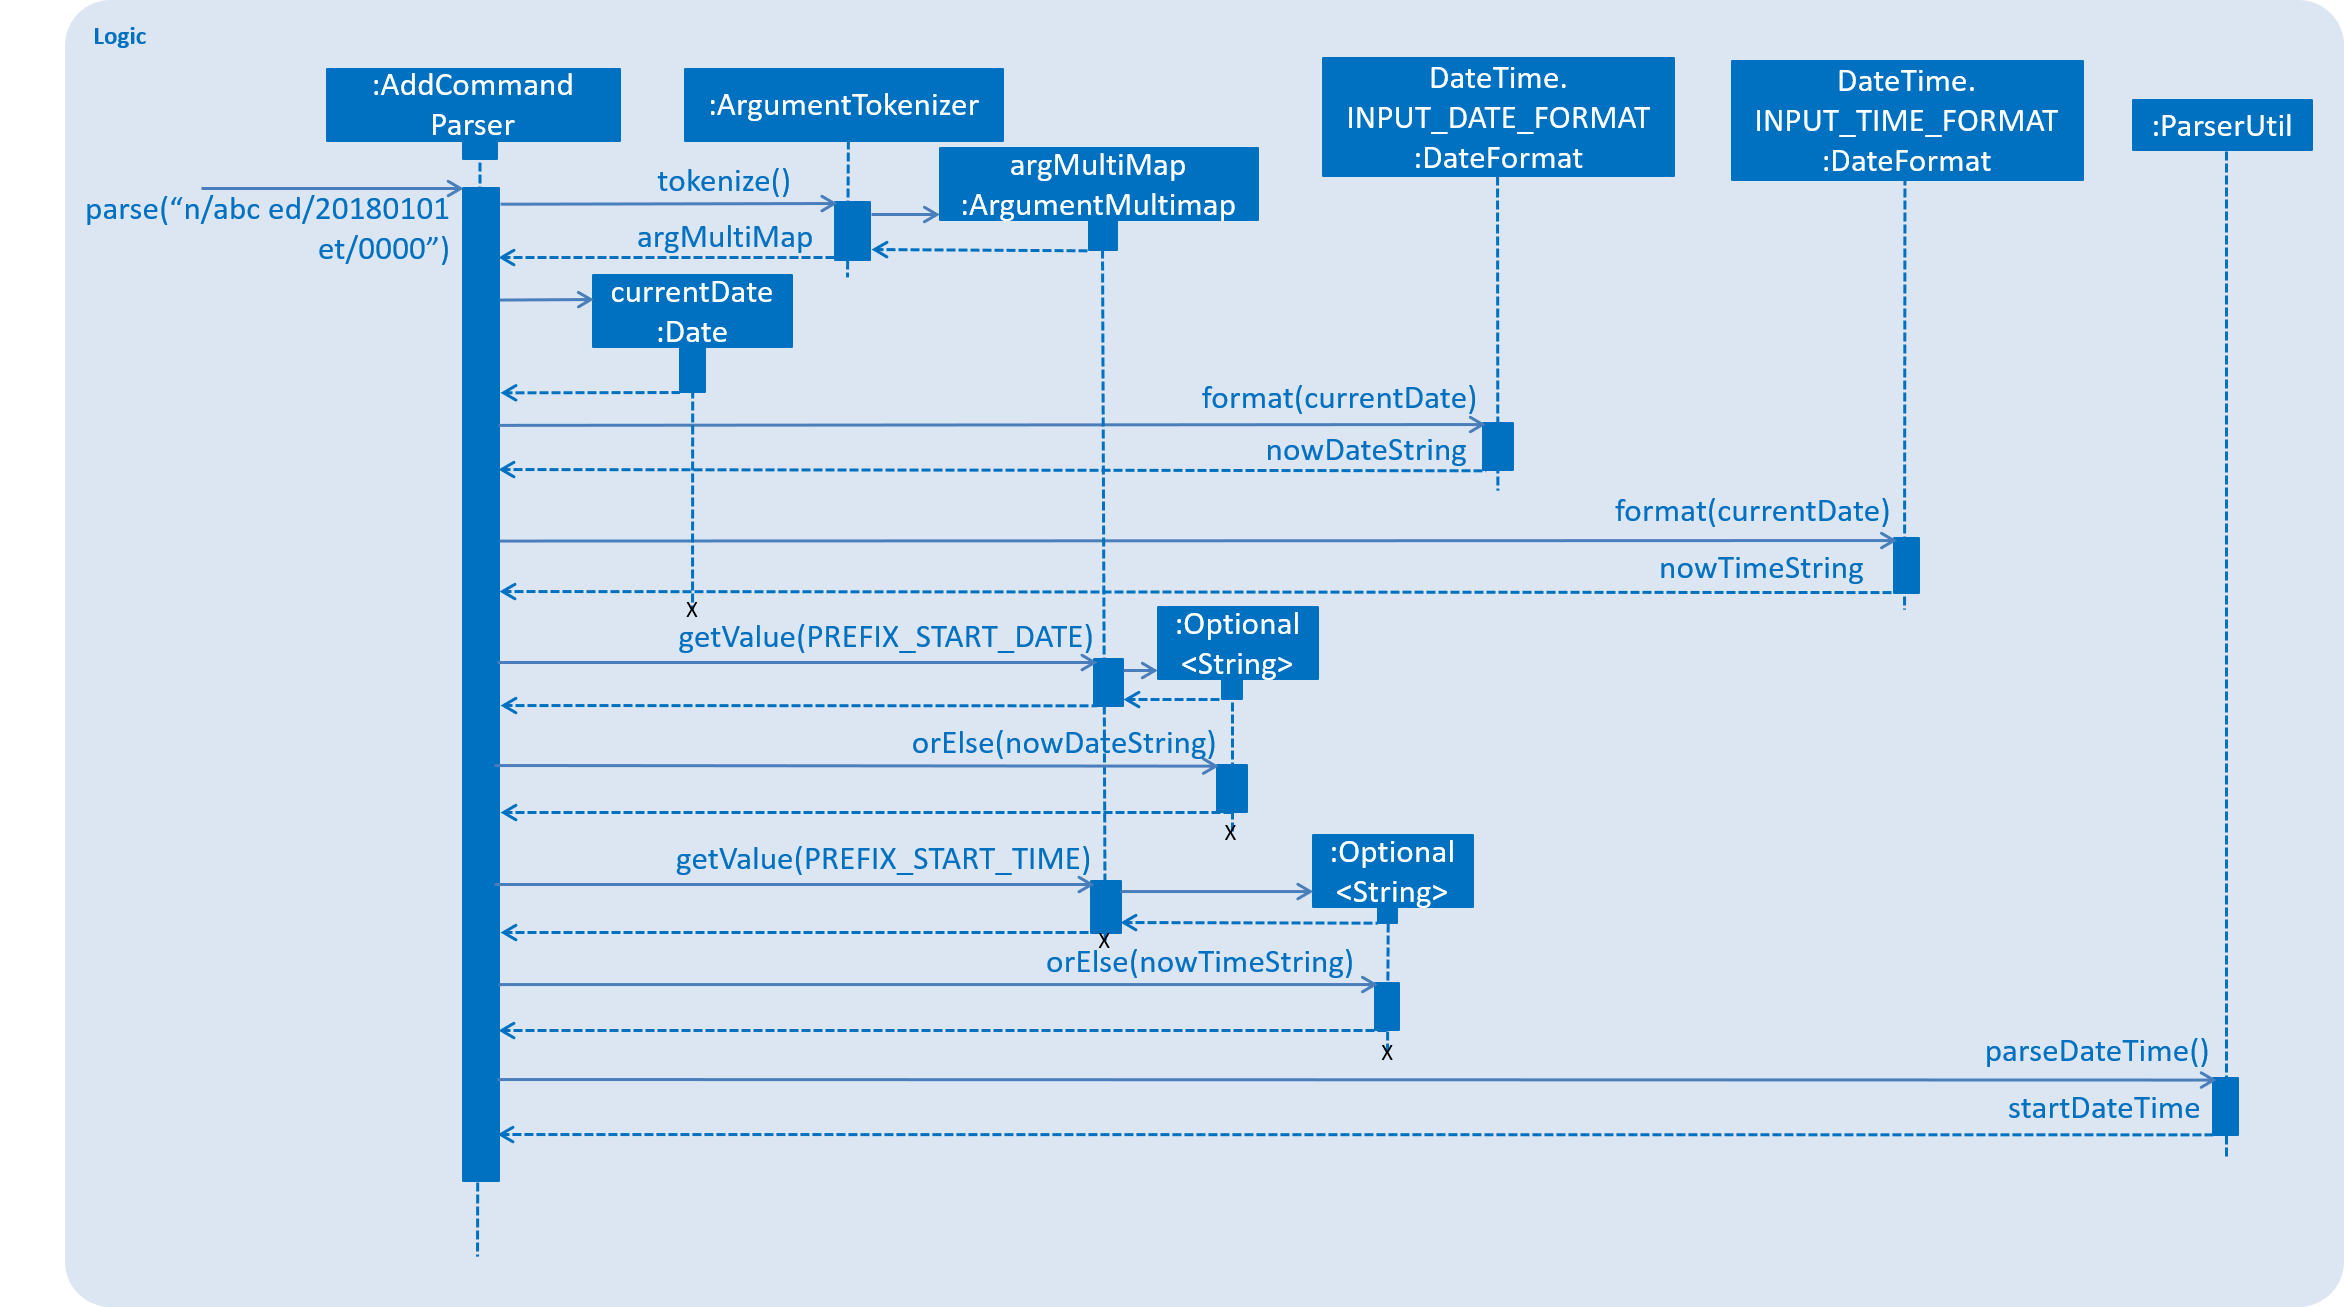
-
The
AddCommandParserreceives the input string and callsArgumentTokenizer.tokenize()to create anArgumentMultiMap. -
It then creates a Date object for the current moment in time and uses the
INPUT_DATE_FORMATandINPUT_TIME_FORMATDateFormats inDateTimeto parse the Date object into date and time strings in the correct format. -
It then retrieves the start date and start time strings from
argMultiMap, which returns anOptional<String>for each of them. -
orElse()is then called on eachOptional<String>to obtain the string encapsulated by theOptional, or the string for the current date/time if theOptionalis empty. -
Finally,
ParserUtil.parseDateTime()is called with the resultant date and time strings.
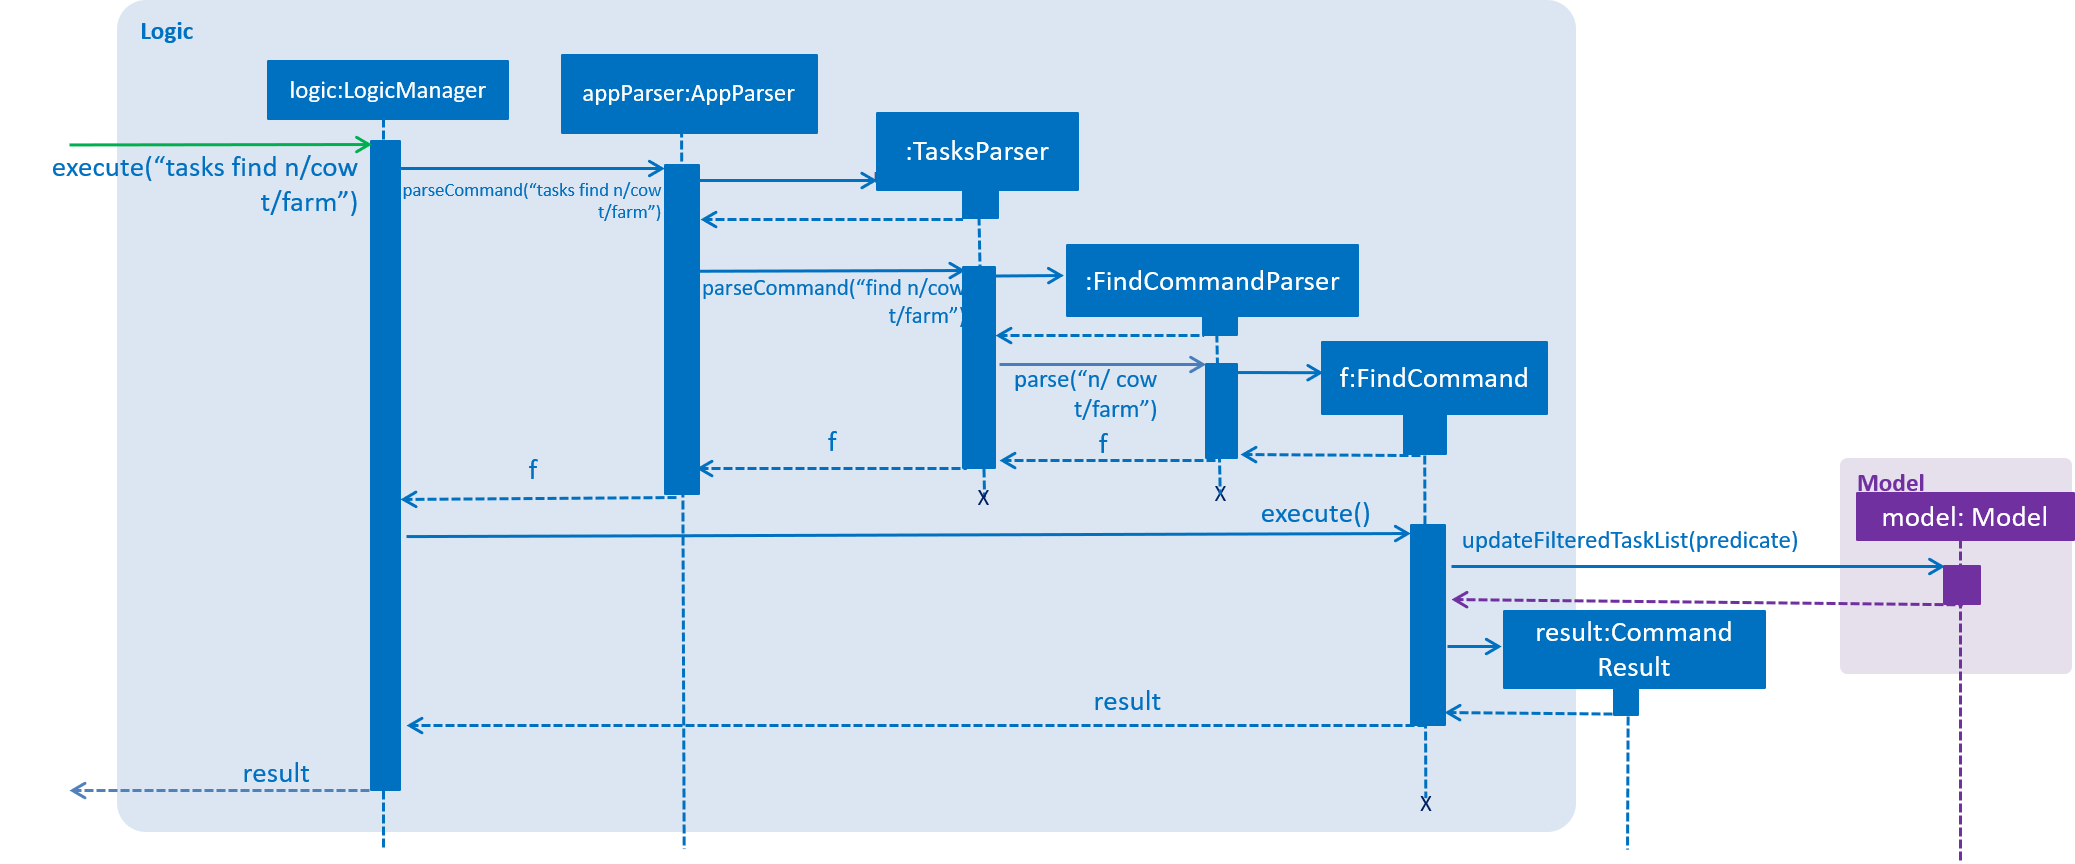
3.3. Listing and finding of tasks
3.3.1. Current Implementation
Listing and finding of tasks is facilitated by ModelManager and displayed through TaskListPanel.
ModelManager implements the following relevant methods:
-
ModelManager#updateFilteredTaskList(Predicate<Task> predicate)— Updates the the internalfilteredTaskslist with the predicate given. Exposed through theModelinterface. -
ModelManager#getFilteredTaskList()— Returns an unmodifiable view of the internalfilteredTaskslist that updates with any changes to the baselist. Exposed through theLogicandModelinterfaces.
ModelManager#filteredTasks is a JavaFX FilteredList around the unmodifiable list of tasks provided by VersionedAddressBook#getTaskList()). |
TaskListPanel is constructed with the JavaFX ObservableList returned by
ModelManager#getFilteredTaskList() when the application is started and displays it.
To find specific tasks, the appropriate predicate is passed into ModelManager#updateFilteredTaskList(), which updates
the filteredTasks list, propagating the change up to the TaskListPanel display.
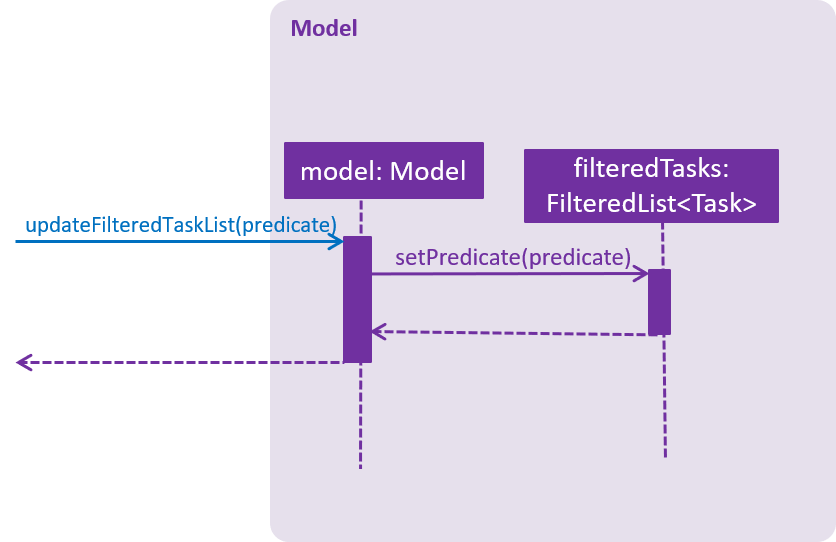
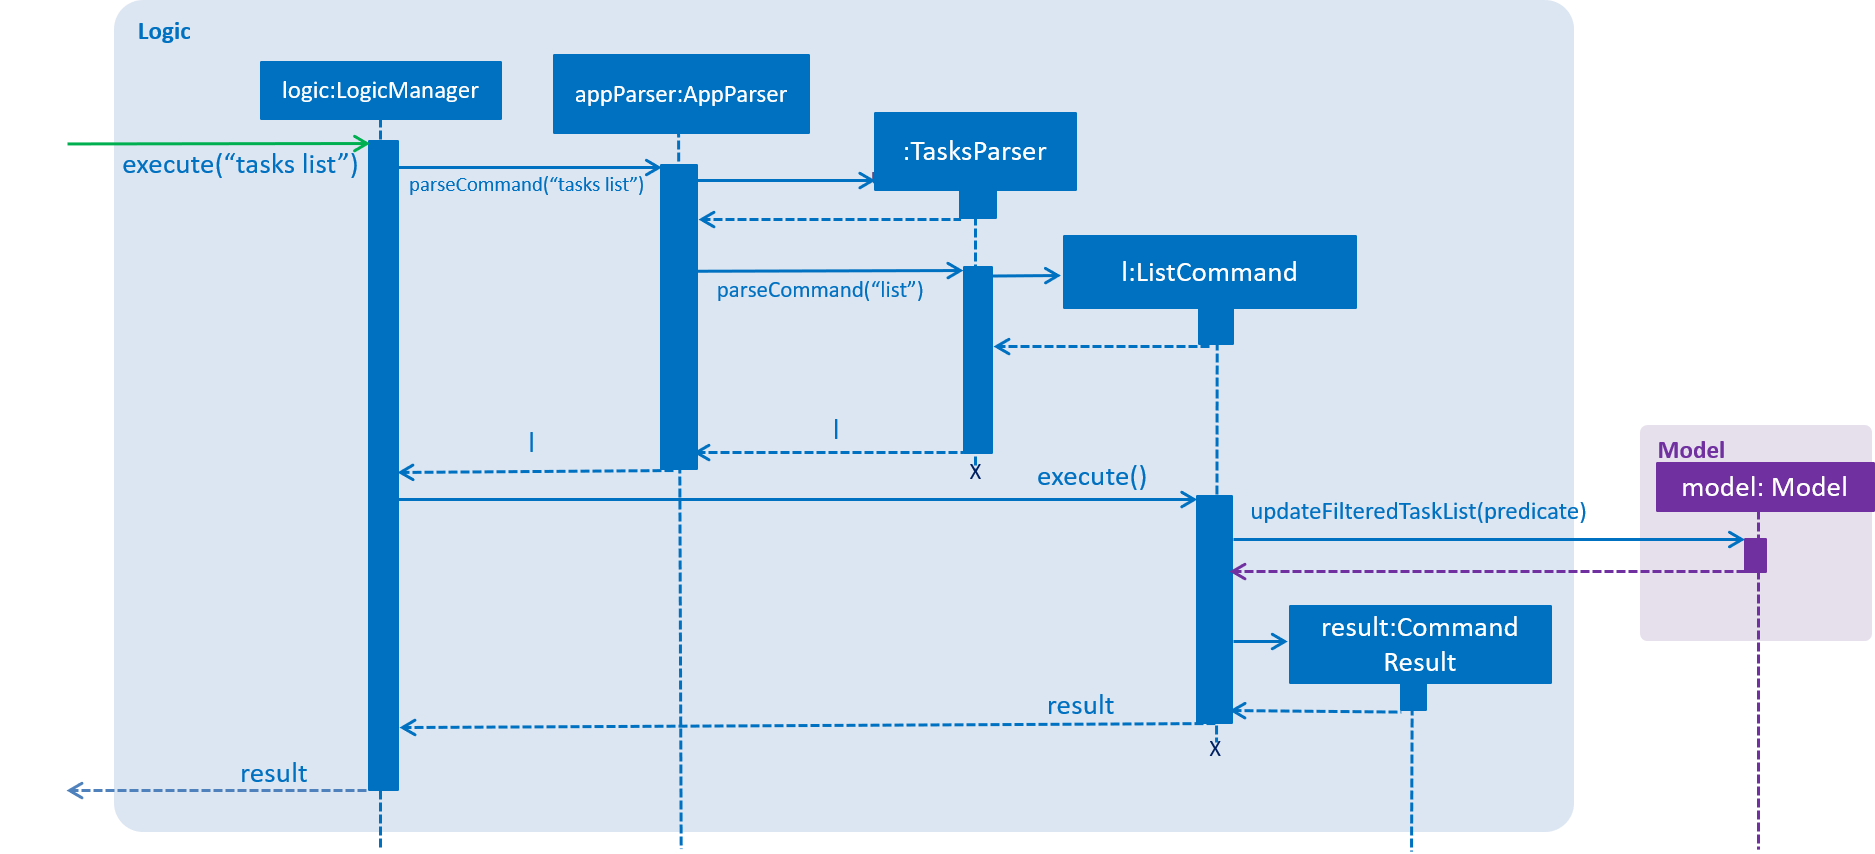
Currently, there are 2 use cases where ModelManager#updateFilteredTaskList() is called, examples are given below.
Case 1: On application startup or after running tasks list command
ModelManager#updateFilteredTaskList() is called with
Model#PREDICATE_SHOW_ALL_TASKS which returns true for all tasks.
Case 2: After running tasks find [n/KEYWORD]… [sd/START_DATE] [ed/END_DATE] [t/TAG]… command
ModelManager#updateFilteredTaskList() is called with predicate built by TaskPredicateAssembler
which combines the different predicates from input.
|
|
3.3.2. Design Considerations
Aspect: Updating of UI when list is filtered
-
Alternative 1 (current choice): Using
ObservableListandListViewfrom JavaFX in UI component.-
Pros:
-
Automatically updates
ListViewwhen changes are made toObservableList, no manual events are needed. -
Addition, updates and deletion of tasks will only need to interface with
LogicandModel.
-
-
Cons:
-
ObservableListdoes not raise change events when tasks in the base list are mutated. Any edits to existing tasks will need to replace the oldTaskinstance with a new one for changes to be reflected on the UI.
-
-
-
Alternative 2: Using Java
Listin UI component.-
Pros:
-
Does not enforce immutability on tasks.
-
Full control over when and what UI should update.
-
-
Cons:
-
Events will need to be raised manually when tasks are changed.
-
-
Aspect: Filtering of lists
-
Alternative 1 (current choice): Using
FilteredListfrom JavaFX.-
Pros:
-
Convenient as the filter is maintained even when the base list is changed.
-
Abstracts away filtering logic, only need to be concerned with the predicate used.
-
Any filter updates will automatically update UI as it implements
ObservableList.
-
-
Cons:
-
Only works as a simple filter.
-
-
-
Alternative 2: Using
Streamsfrom Java.-
Pros:
-
Powerful, can also be used to transform tasks as an intermediate operation.
-
-
Cons:
-
For the same predicate, a new stream will need to be made when the task list is changed.
-
Events will need to be raised to update UI on newly filtered list of tasks.
-
-
3.3.3. Future Enhancements
Currently, searching by task name only matches full keywords. In the future, part of words can be matched to allow users to search with incomplete keywords.
3.4. Undo/Redo feature
3.4.1. Current Implementation
The undo/redo mechanism is facilitated by VersionedAddressBook.
It extends AddressBook with an undo/redo history, stored internally as an addressBookStateList and currentStatePointer.
Additionally, it implements the following operations:
-
VersionedAddressBook#commit()— Saves the current address book state in its history. -
VersionedAddressBook#undo()— Restores the previous address book state from its history. -
VersionedAddressBook#redo()— Restores a previously undone address book state from its history.
These operations are exposed in the Model interface as Model#commitAddressBook(), Model#undoAddressBook() and Model#redoAddressBook() respectively.
Given below is an example usage scenario and how the undo/redo mechanism behaves at each step.
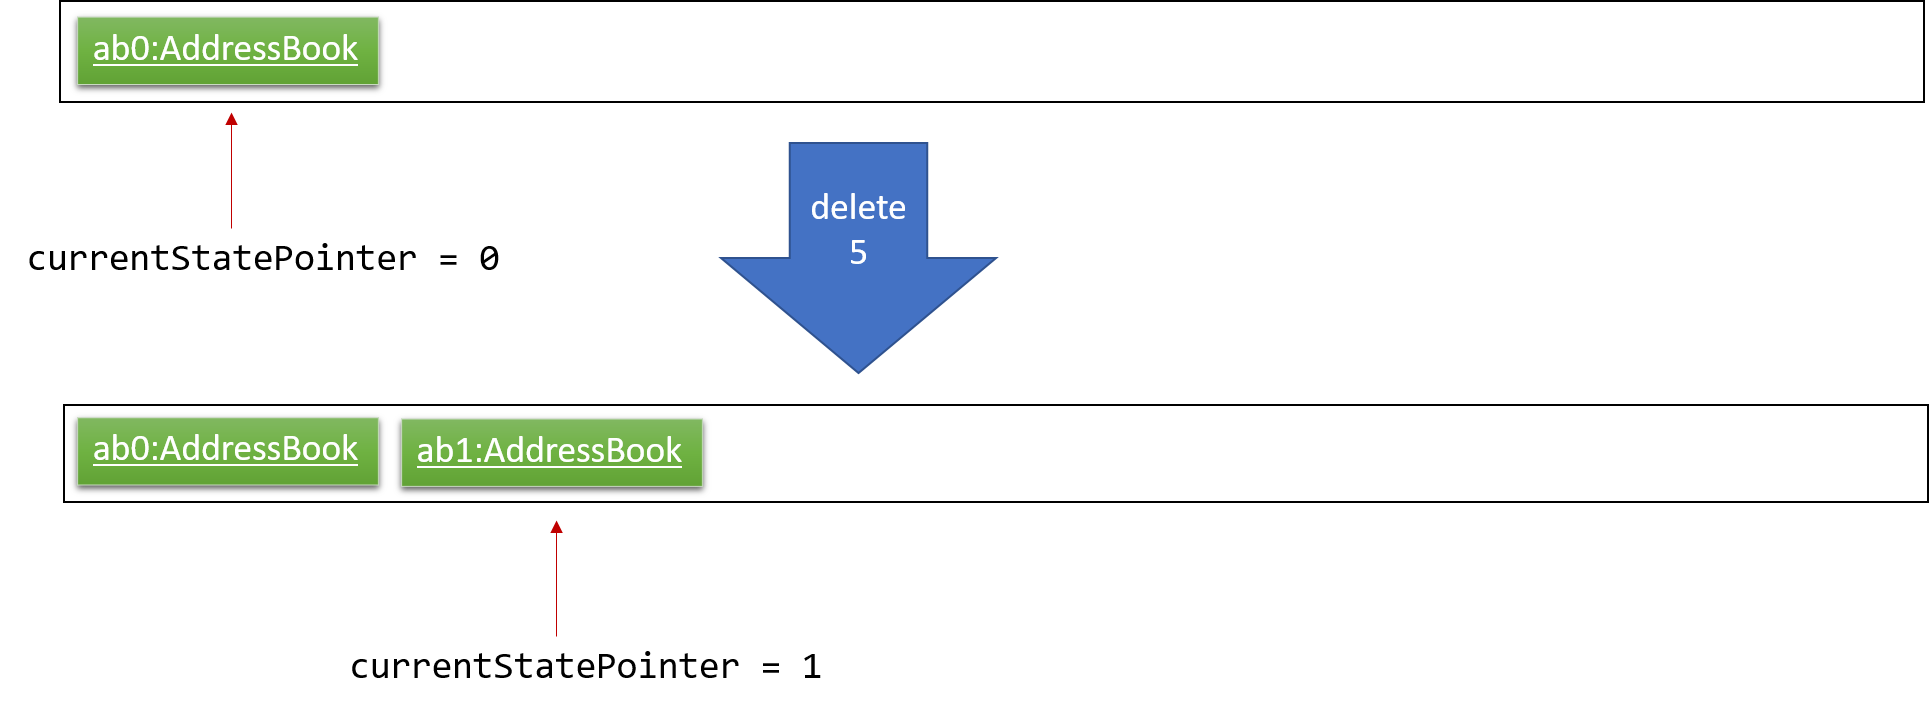
Step 1. The user launches the application for the first time. The VersionedAddressBook will be initialized with the initial address book state, and the currentStatePointer pointing to that single address book state.

Step 2. The user executes delete 5 command to delete the 5th person in the address book. The delete command calls Model#commitAddressBook(), causing the modified state of the address book after the delete 5 command executes to be saved in the addressBookStateList, and the currentStatePointer is shifted to the newly inserted address book state.
Step 3. The user executes add n/David … to add a new person. The add command also calls Model#commitAddressBook(), causing another modified address book state to be saved into the addressBookStateList.
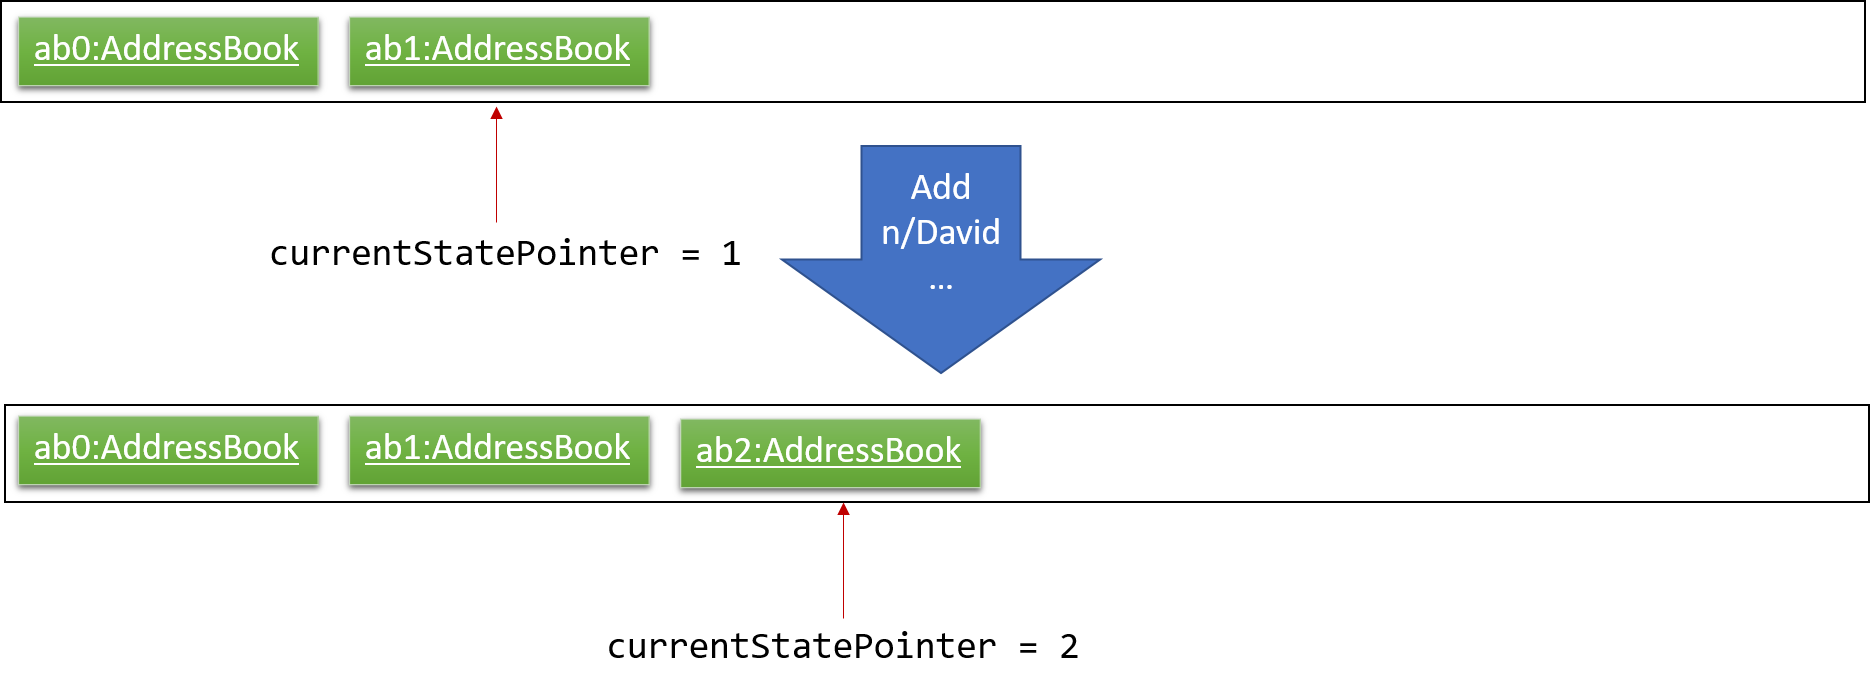
If a command fails its execution, it will not call Model#commitAddressBook(), so the address book state will not be saved into the addressBookStateList.
|
Step 4. The user now decides that adding the person was a mistake, and decides to undo that action by executing the undo command. The undo command will call Model#undoAddressBook(), which will shift the currentStatePointer once to the left, pointing it to the previous address book state, and restores the address book to that state.
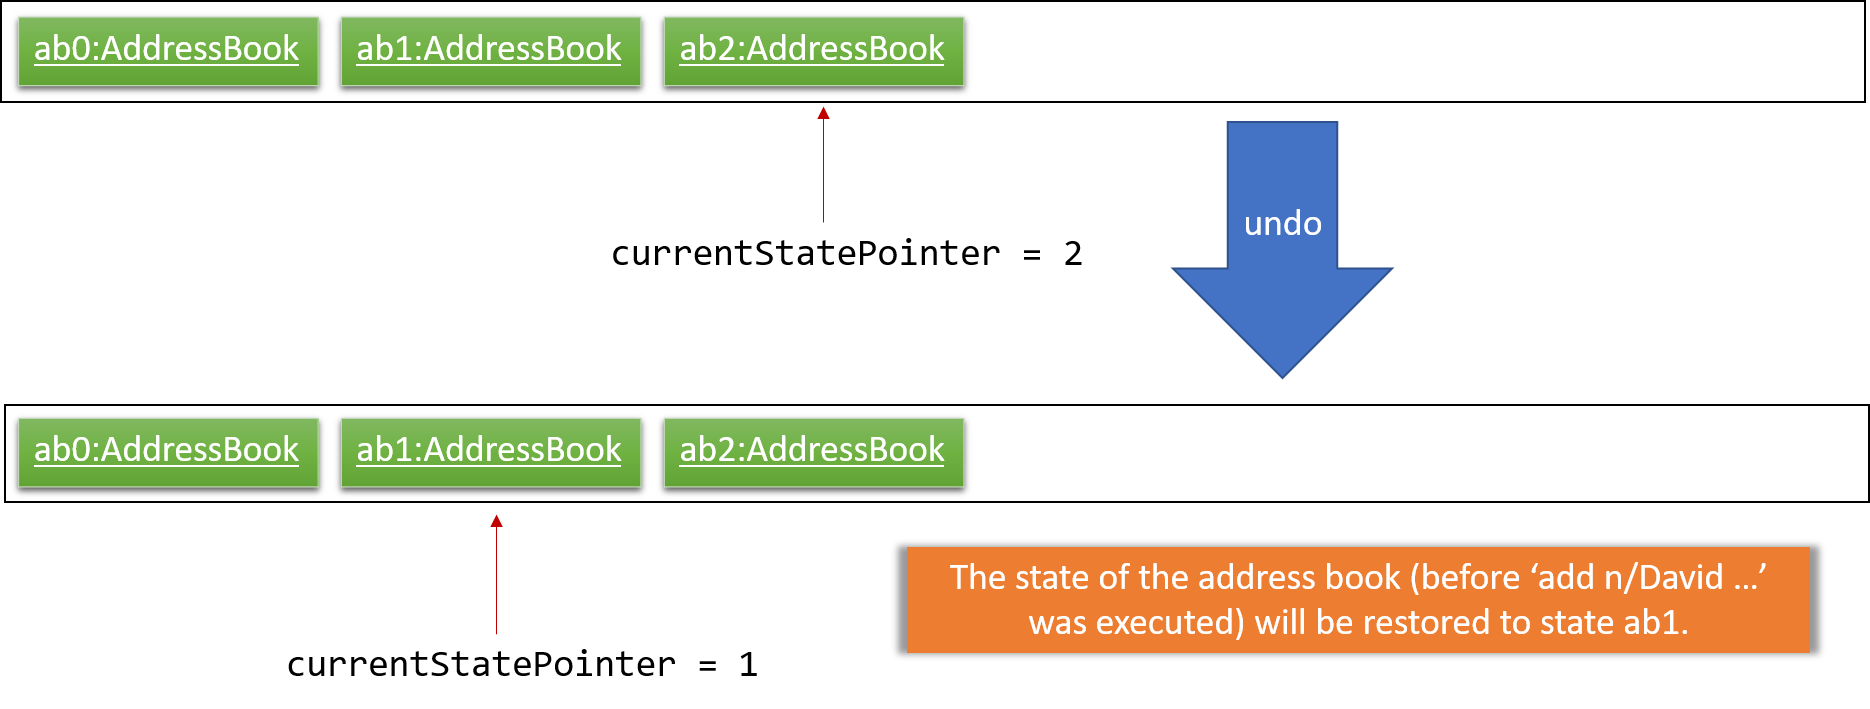
If the currentStatePointer is at index 0, pointing to the initial address book state, then there are no previous address book states to restore. The undo command uses Model#canUndoAddressBook() to check if this is the case. If so, it will return an error to the user rather than attempting to perform the undo.
|
The following sequence diagram shows how the undo operation works:
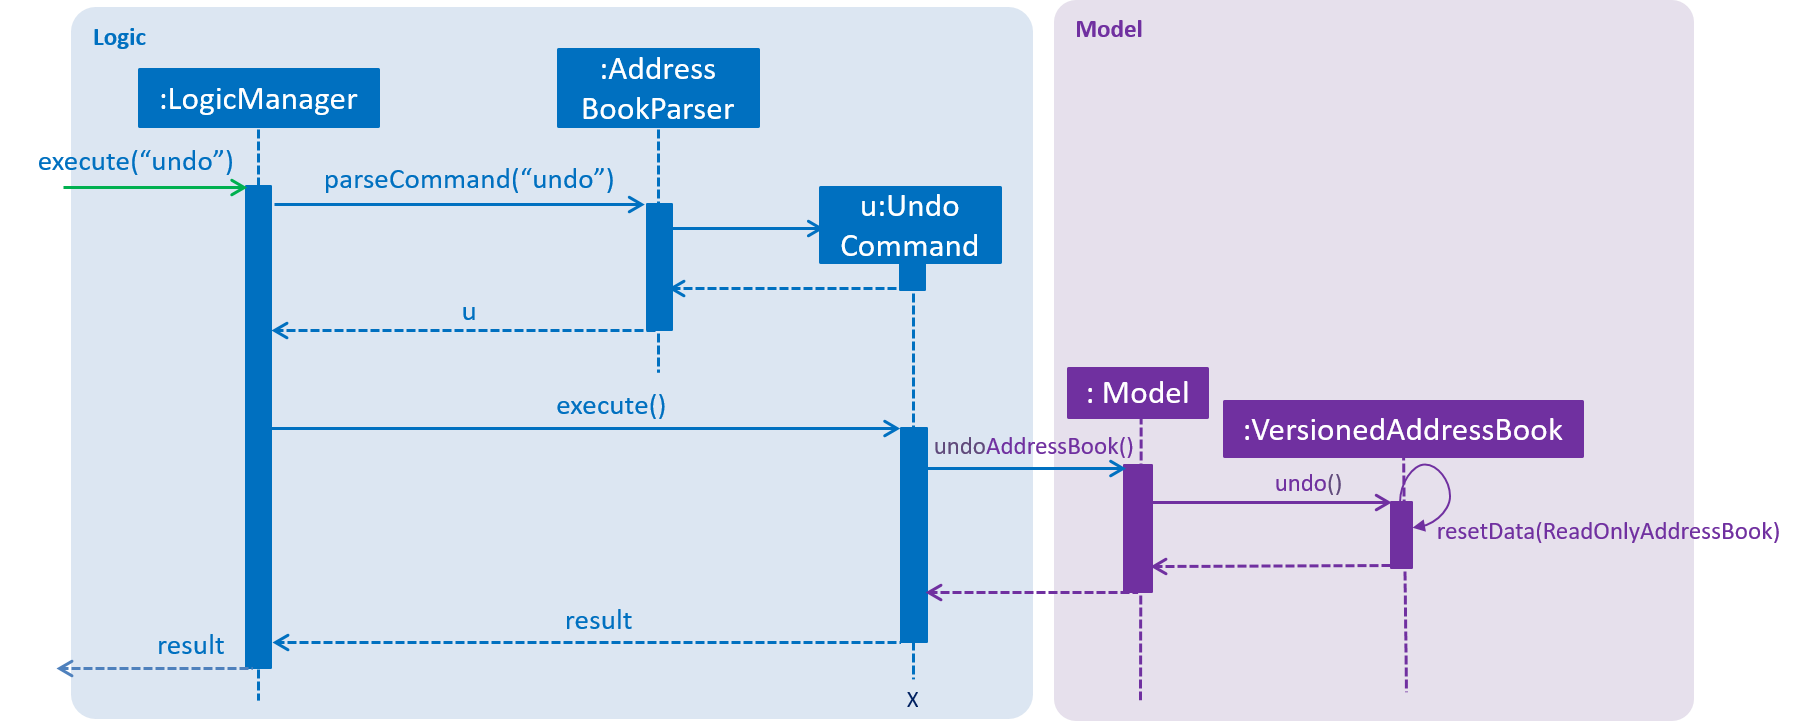
The redo command does the opposite — it calls Model#redoAddressBook(), which shifts the currentStatePointer once to the right, pointing to the previously undone state, and restores the address book to that state.
If the currentStatePointer is at index addressBookStateList.size() - 1, pointing to the latest address book state, then there are no undone address book states to restore. The redo command uses Model#canRedoAddressBook() to check if this is the case. If so, it will return an error to the user rather than attempting to perform the redo.
|
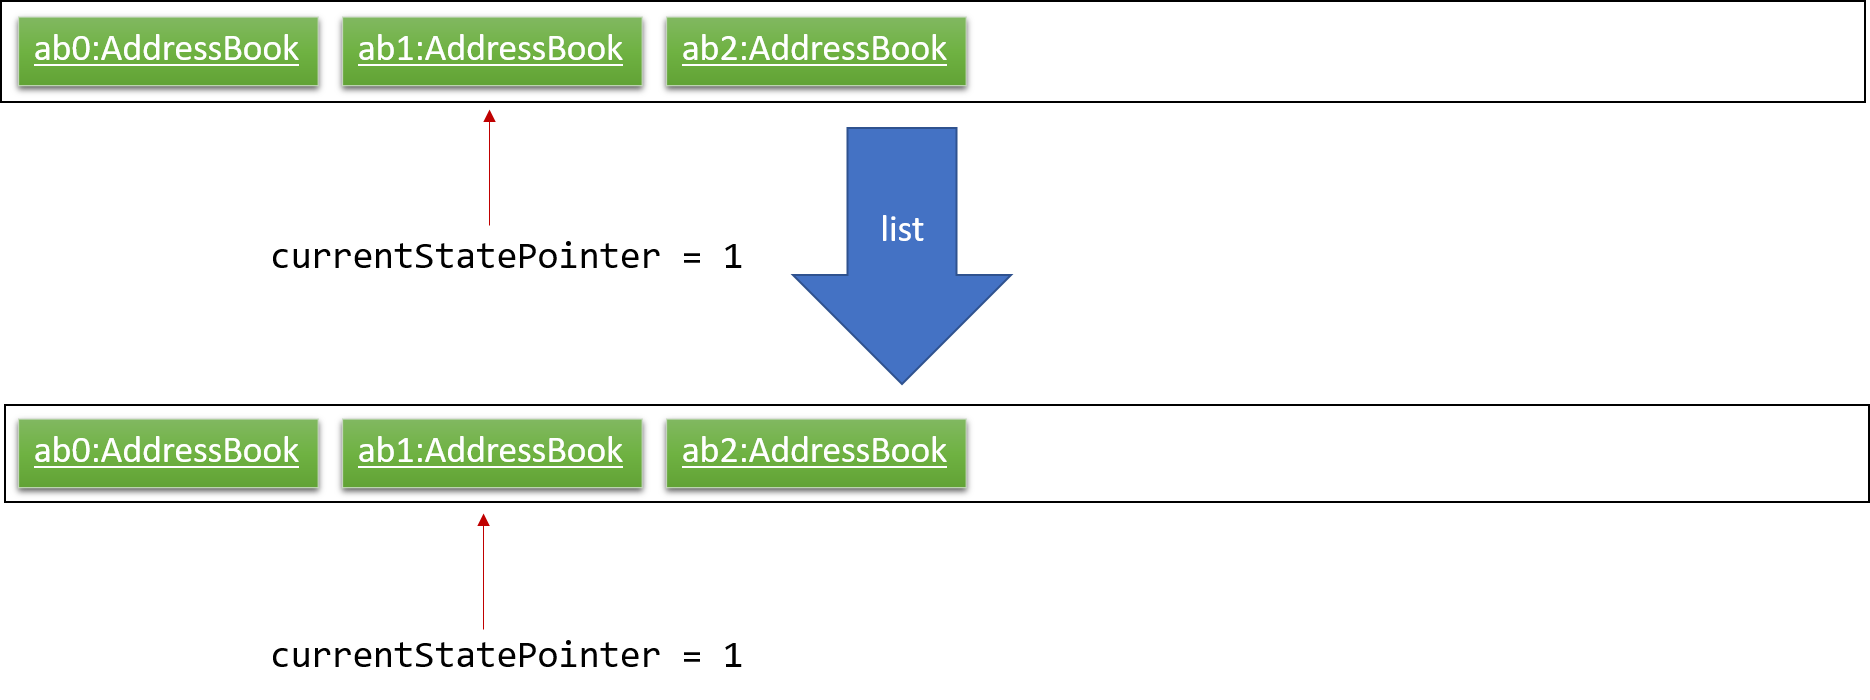
Step 5. The user then decides to execute the command list. Commands that do not modify the address book, such as list, will usually not call Model#commitAddressBook(), Model#undoAddressBook() or Model#redoAddressBook(). Thus, the addressBookStateList remains unchanged.
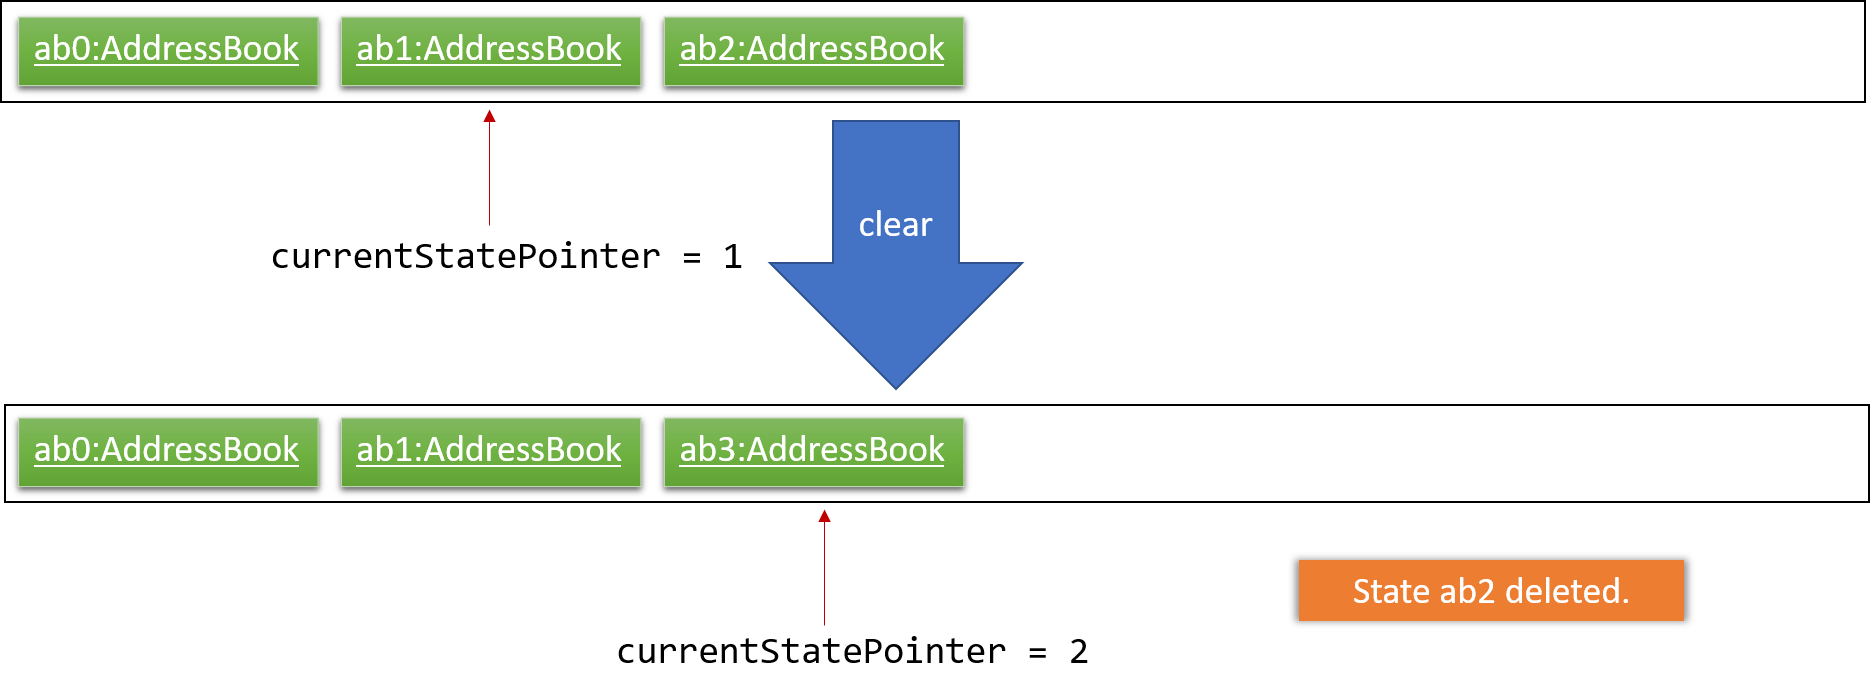
Step 6. The user executes clear, which calls Model#commitAddressBook(). Since the currentStatePointer is not pointing at the end of the addressBookStateList, all address book states after the currentStatePointer will be purged. We designed it this way because it no longer makes sense to redo the add n/David … command. This is the behavior that most modern desktop applications follow.
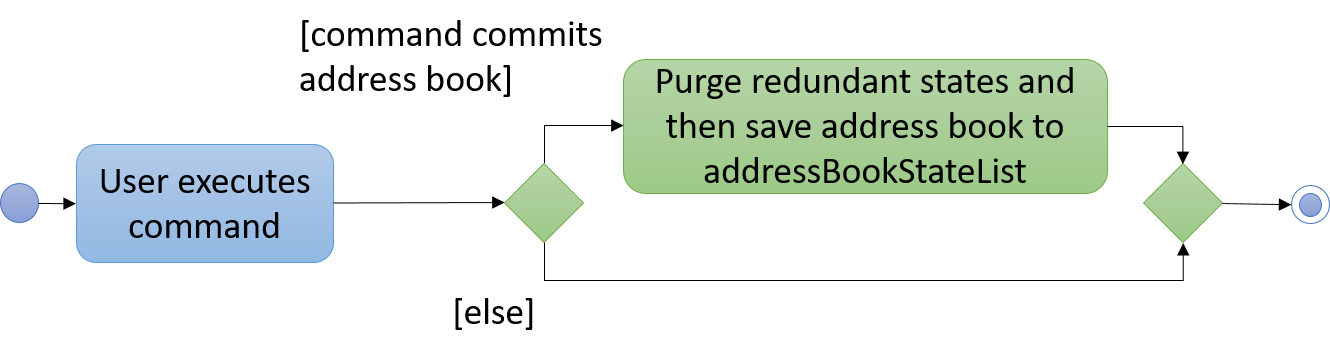
The following activity diagram summarizes what happens when a user executes a new command:
3.4.2. Design Considerations
Aspect: How undo & redo executes
-
Alternative 1 (current choice): Saves the entire address book.
-
Pros: Easy to implement.
-
Cons: May have performance issues in terms of memory usage.
-
-
Alternative 2: Individual command knows how to undo/redo by itself.
-
Pros: Will use less memory (e.g. for
delete, just save the person being deleted). -
Cons: We must ensure that the implementation of each individual command are correct.
-
Aspect: Data structure to support the undo/redo commands
-
Alternative 1 (current choice): Use a list to store the history of address book states.
-
Pros: Easy for new Computer Science student undergraduates to understand, who are likely to be the new incoming developers of our project.
-
Cons: Logic is duplicated twice. For example, when a new command is executed, we must remember to update both
HistoryManagerandVersionedAddressBook.
-
-
Alternative 2: Use
HistoryManagerfor undo/redo-
Pros: We do not need to maintain a separate list, and just reuse what is already in the codebase.
-
Cons: Requires dealing with commands that have already been undone: We must remember to skip these commands. Violates Single Responsibility Principle and Separation of Concerns as
HistoryManagernow needs to do two different things.
-
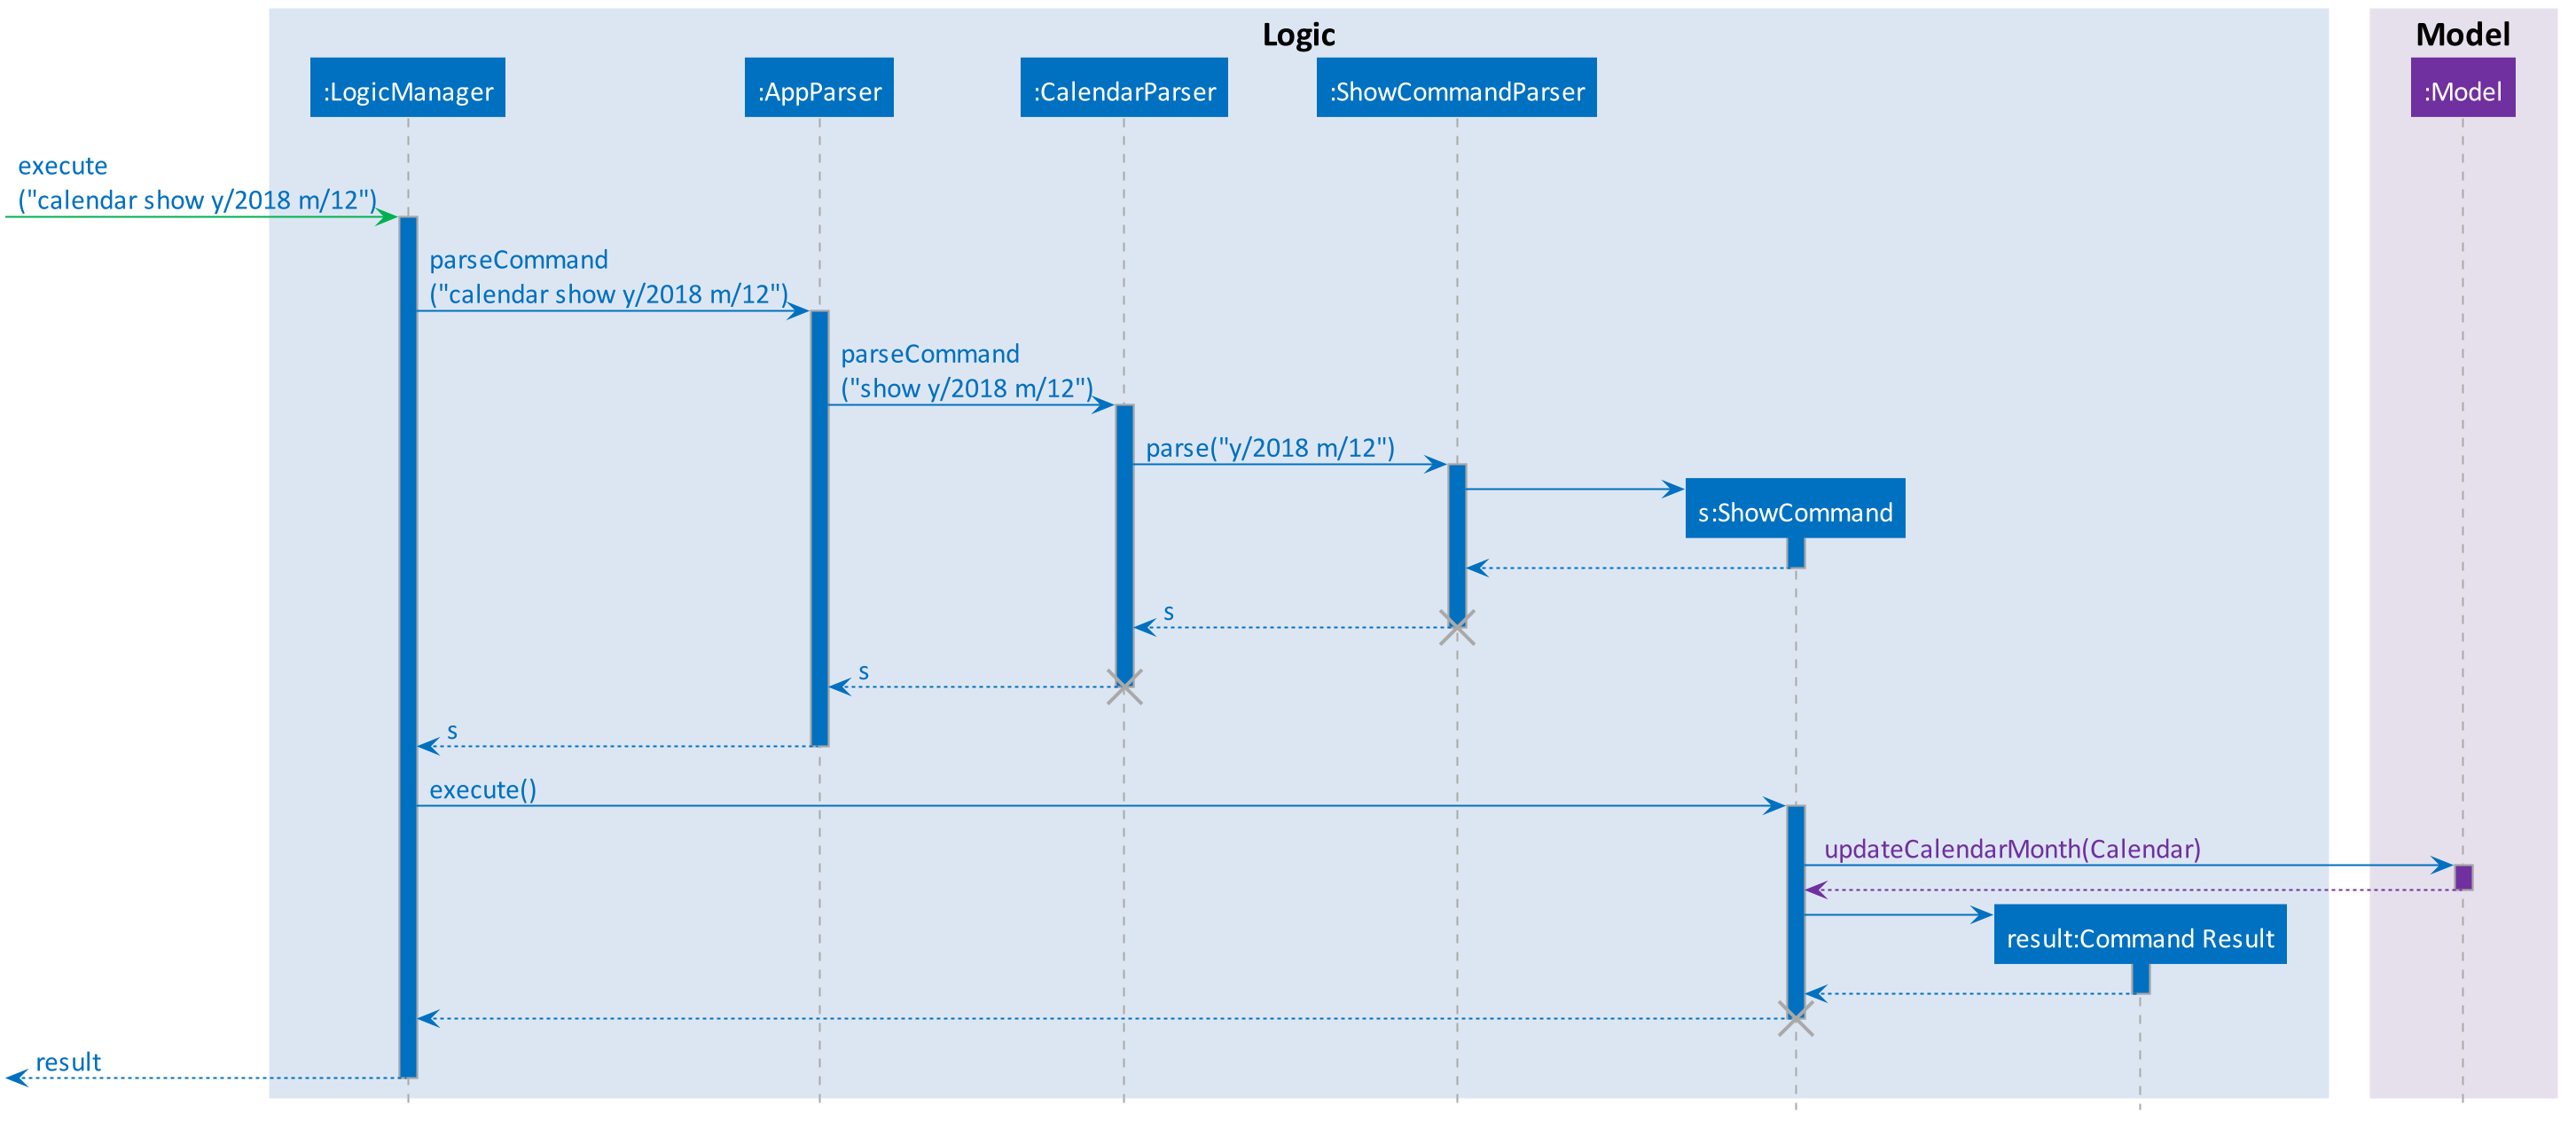
3.5. Calendar show feature
3.5.1. Current Implementation
The calendar show feature is facilitated by the ModelManager and displayed through the CalendarPanel. The purpose of this feature is to allow the user to more easily view his tasks.
This feature can be broken down into two stages: updating the model based on user input and rendering the UI.
Stage 1: Input handling
The following operation is exposed via the Model interface:
-
Model#updateCalendarMonth()— Saves the given calendar that encapsulates the month to be displayed in the calendar panel.
The basic flow of the calendar show command is as such:
Step 1. The user enters the command calendar show y/2018 m/12
Step 2. The command is parsed and a ShowCommand object is created with the appropate values for year and month.
Step 3. The ShowCommand#execute() method is invoked, and Model#updateCalendarMont() is called with a Calendar object encapsulating the first day of the specified month 1 Dec 2018.
| The date of the month is arbitrarily chosen. However this is not strictly necessary as the necessary processing will be done by the UI component when rendering the calendar. |
This is summarised in the following image.
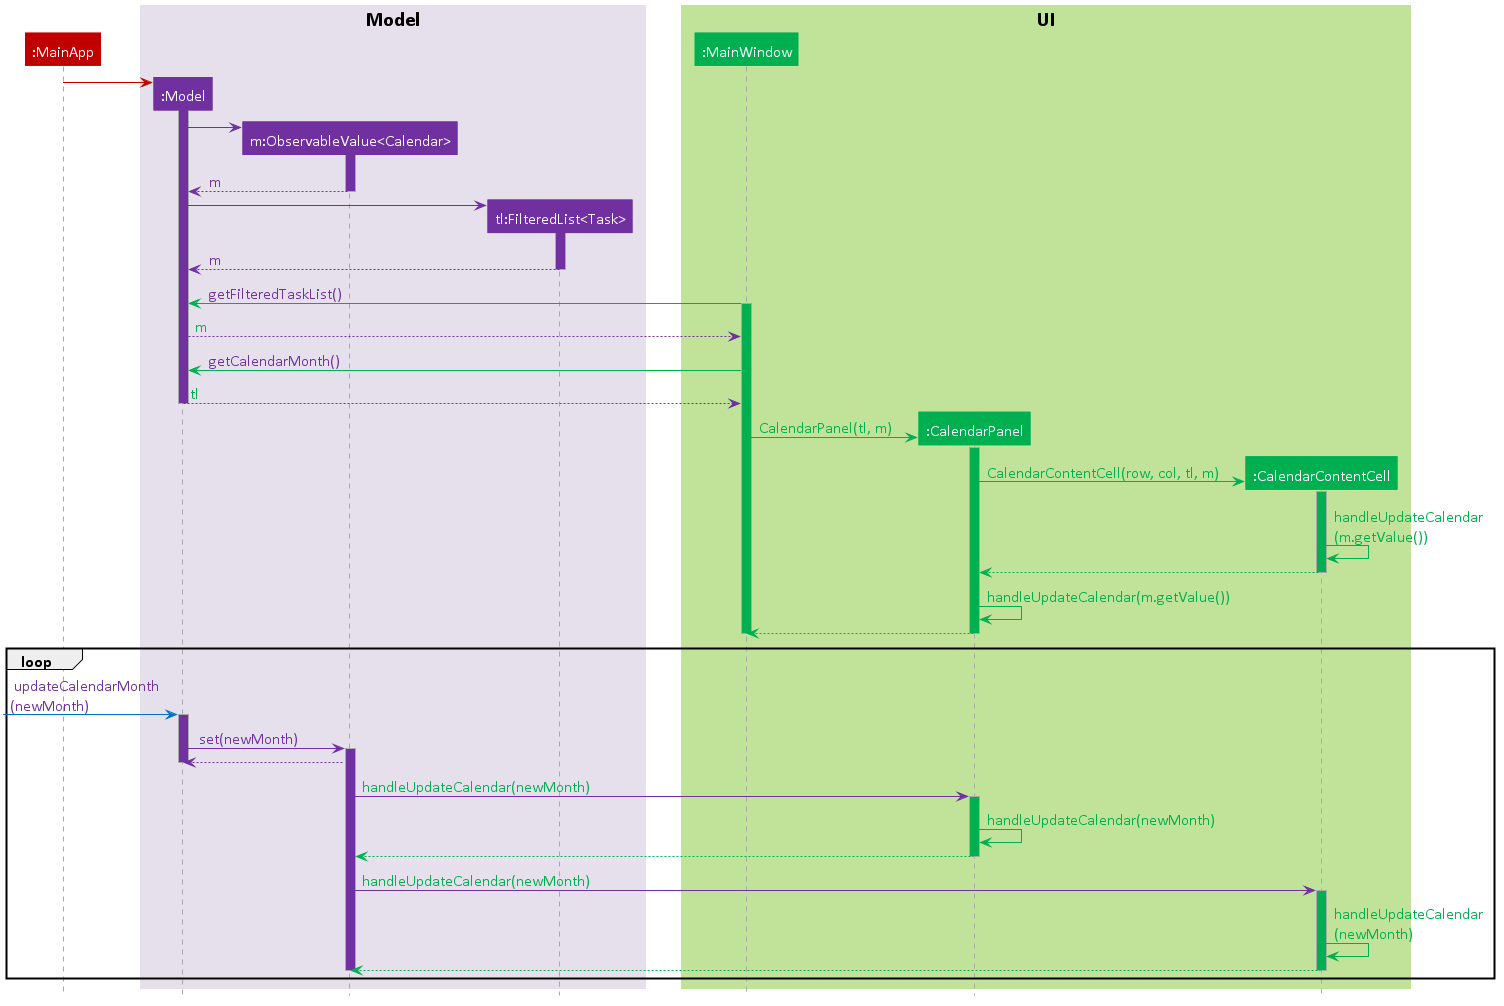
Stage 2: UI Rendering
The following operation is exposed via the Model interface:
-
Model#getCalendarMonth()— Returns anObservableValue<Calendar>for the calendar UI elements to determine the month to display and the weekday it starts on.
Given below is how the calendar UI is initialised.
Step 1. The user launches the application. The Model is initialised with a ObservableValue<Calendar> representing the current date. The MainWindow class calls Model#getCalendarMonth() and Model#getFilteredTaskList() when creating the CalendarPanel. This initialises the CalendarPanel with an ObservableList<Task> and ObservableValue<Calendar> to allow it to perform UI updates when necessary.
Step 2. The CalendarPanel constructs a GridPane and sets the row and column constraints.
Step 3. The CalendarPanel populates the GridPane. The cells in the header row are populated with CalendarHeaderCell elements containing the days of a week. All other cells are populated with CalendarContentCell elements based on its position in the grid. The CalendarContentCell elements are intialised with the ObservableList<Task> and ObservableValue<Calendar>.
Step 4. The CalendarContentCell computes the date that it represents based on the calendar it receives and its position in the grid. It then creates a FilteredList<Task> from the ObservableList<Task> that only contains tasks belonging to that state. Finally, the ListView<Task> element configured to display elements in the FilteredList<Task> with CalendarTaskCard elements.
Step 5. The CalendarContentCell listens to updates to the ObservableValue<Calendar> that would update the predicate for the FilteredList<Task>.
Step 6. The CalendarPanel writes the header for the month and year it is displaying.
Step 7. The CalendarPanel listens to updates to the ObservableValue<Calendar> that would update the calendar header with the month and year of the new value.
Initialisation complete.
Given below is how calendar show command is handled by the UI components.
Step 1. The user enters calendar show y/2018 m/1. This causes Model#updateCalendarMonth to called, which sets the new value for the ObservableValue<Calendar>.
Step 2. The update to the ObservableValue<Calendar> triggers the listener registered by the CalendarPanel. This causes the calendar header to be updated via CalendarPanel#handleUpdateCalendar.
Step 3. The update to the ObservableValue<Calendar> triggers the listener registered by the CalendarContentCell. This causes it to recompute the date that it represents and update the predicate for its FilteredList<Task>. This causes cell to display the appropriate tasks based on the new designated month.
Update complete.
The image below summarises the abovementioned mechanism for a single cell in the calendar.
3.5.2. Design Considerations
Aspect: Where to filter tasks by month for displaying in the calendar.
-
Alternative 1 (current choice): Calendar object representing current month and full task list passed to calendar pane, all filter operations done in the calendar pane.
-
Pros:
-
Less data duplication.
-
Allows effect of task filtering via the CLI to also be visible in the calendar view.
-
Allows display of tasks in adjacent months.
-
-
Cons:
-
Slightly less efficient since each cell needs to filter the entire task list.
-
-
-
Alternative 1: Done in the model
-
Pros:
-
Application logic does not reside in the view layer.
-
-
Cons:
-
Repeated filtering at multiple steps.
-
Task data is duplicated in multiple places.
-
Difficult to display events from adjacent months.
-
-
Aspect: Construction of grid cell.
-
Alternative 1 (current choice): Cells are constructed once and contents are updated each time the month is changed
-
Pros:
-
Better performance: Deleting and recreating elements incurs some computational cost.
-
Cleaner abstraction: Code better follows Single Responsibility Principle. Updating of predicate for a
FilteredList<Task>more accurately represents the actual behaviour being modelled.
-
-
Cons:
-
Increased complexity of implementation.
-
-
-
Alternative 2: Delete and regenerate cell contents each time the month is changed
-
Pros:
-
Ease of implementation.
-
-
Cons:
-
Poorer performance.
-
Messy code. One huge class will be used for the entire calendar.
-
-
3.6. Logging
We are using java.util.logging package for logging. The LogsCenter class is used to manage the logging levels and logging destinations.
-
The logging level can be controlled using the
logLevelsetting in the configuration file (See Section 3.7, “Configuration”) -
The
Loggerfor a class can be obtained usingLogsCenter.getLogger(Class)which will log messages according to the specified logging level -
Currently log messages are output through:
Consoleand to a.logfile.
Logging Levels
-
SEVERE: Critical problem detected which may possibly cause the termination of the application -
WARNING: Can continue, but with caution -
INFO: Information showing the noteworthy actions by the App -
FINE: Details that is not usually noteworthy but may be useful in debugging e.g. print the actual list instead of just its size
3.7. Configuration
Certain properties of the application can be controlled (e.g App name, logging level) through the configuration file (default: config.json).
3.8. Editing and Batch Deleting Tasks
3.8.1. Current implementation
The code for editing and deleting tasks is actually pretty similar to how it is implemented for persons. This is a combination of adding support for two additional commands: tasks edit and tasks delete inside TasksParser, defining the parser classes EditCommandParser and DeleteCommandParser, and the command classes EditCommand and DeleteCommand, and finally, adding void updateTask(Task target, Task editedTask); and void deleteTask(Task target); in the Model interface, and implementing them in the ModelManager class.
As for validation, in EditCommandParser, user input will be checked whether they conform to the format, else ParseException is thrown and usage message will be shown to the user. Meanwhile, EditCommand does another kind of validation: that the start date and time are before the end date and time, else CommandException is thrown and the user will be informed to ensure the chronological order of start and end DateTime. All these validations are done using methods defined inside DateTime.
To explain more clearly, you can see below a sequence diagram of what happens when the user asks the program to edit a task:
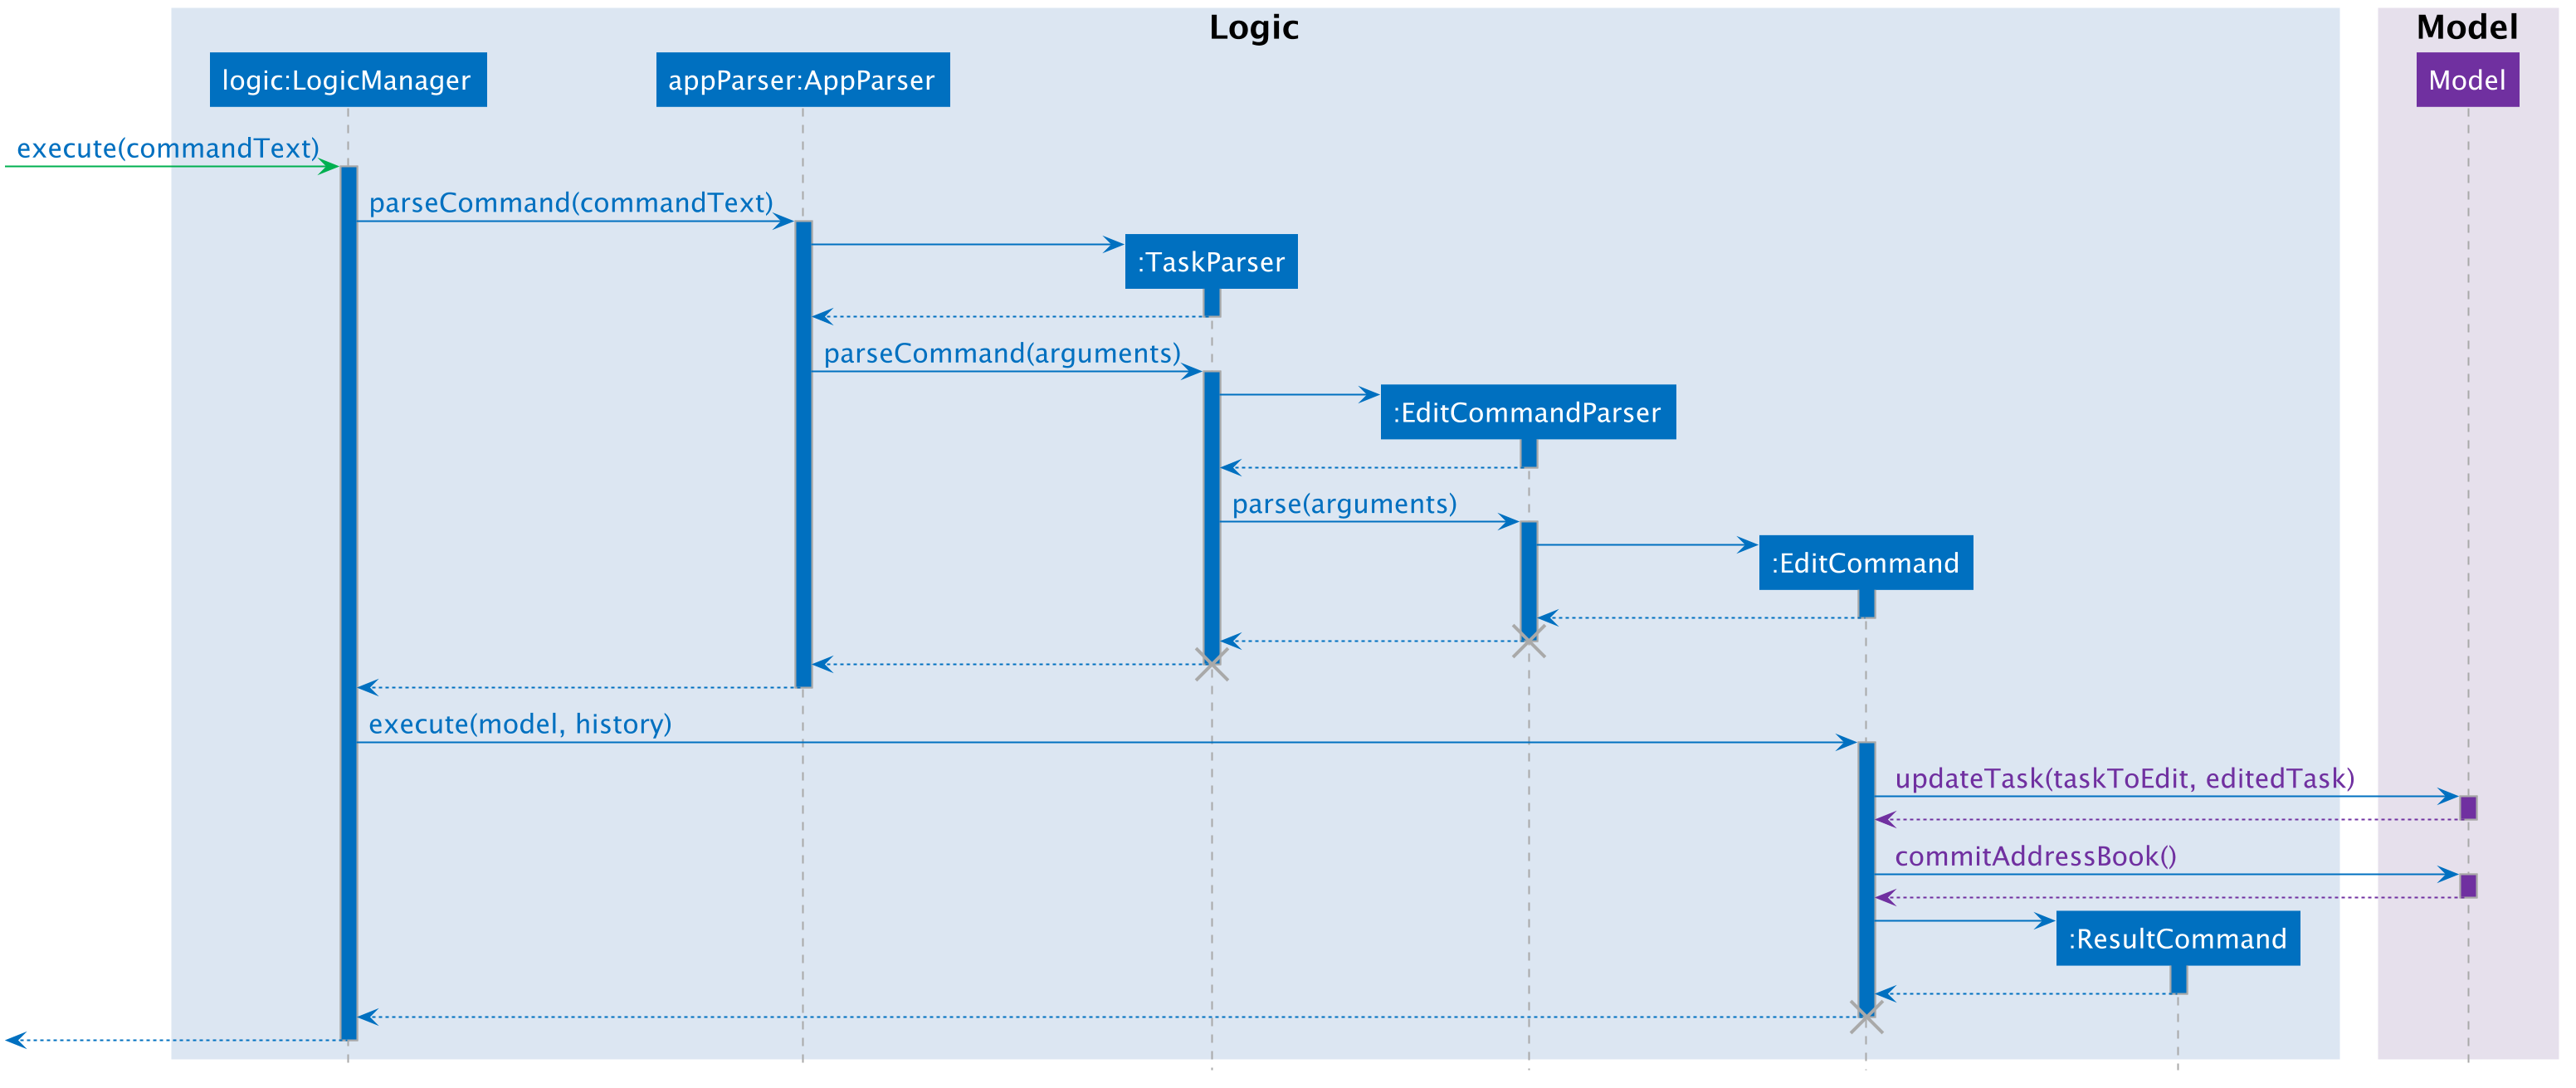
tasks edit Command in the Logic Component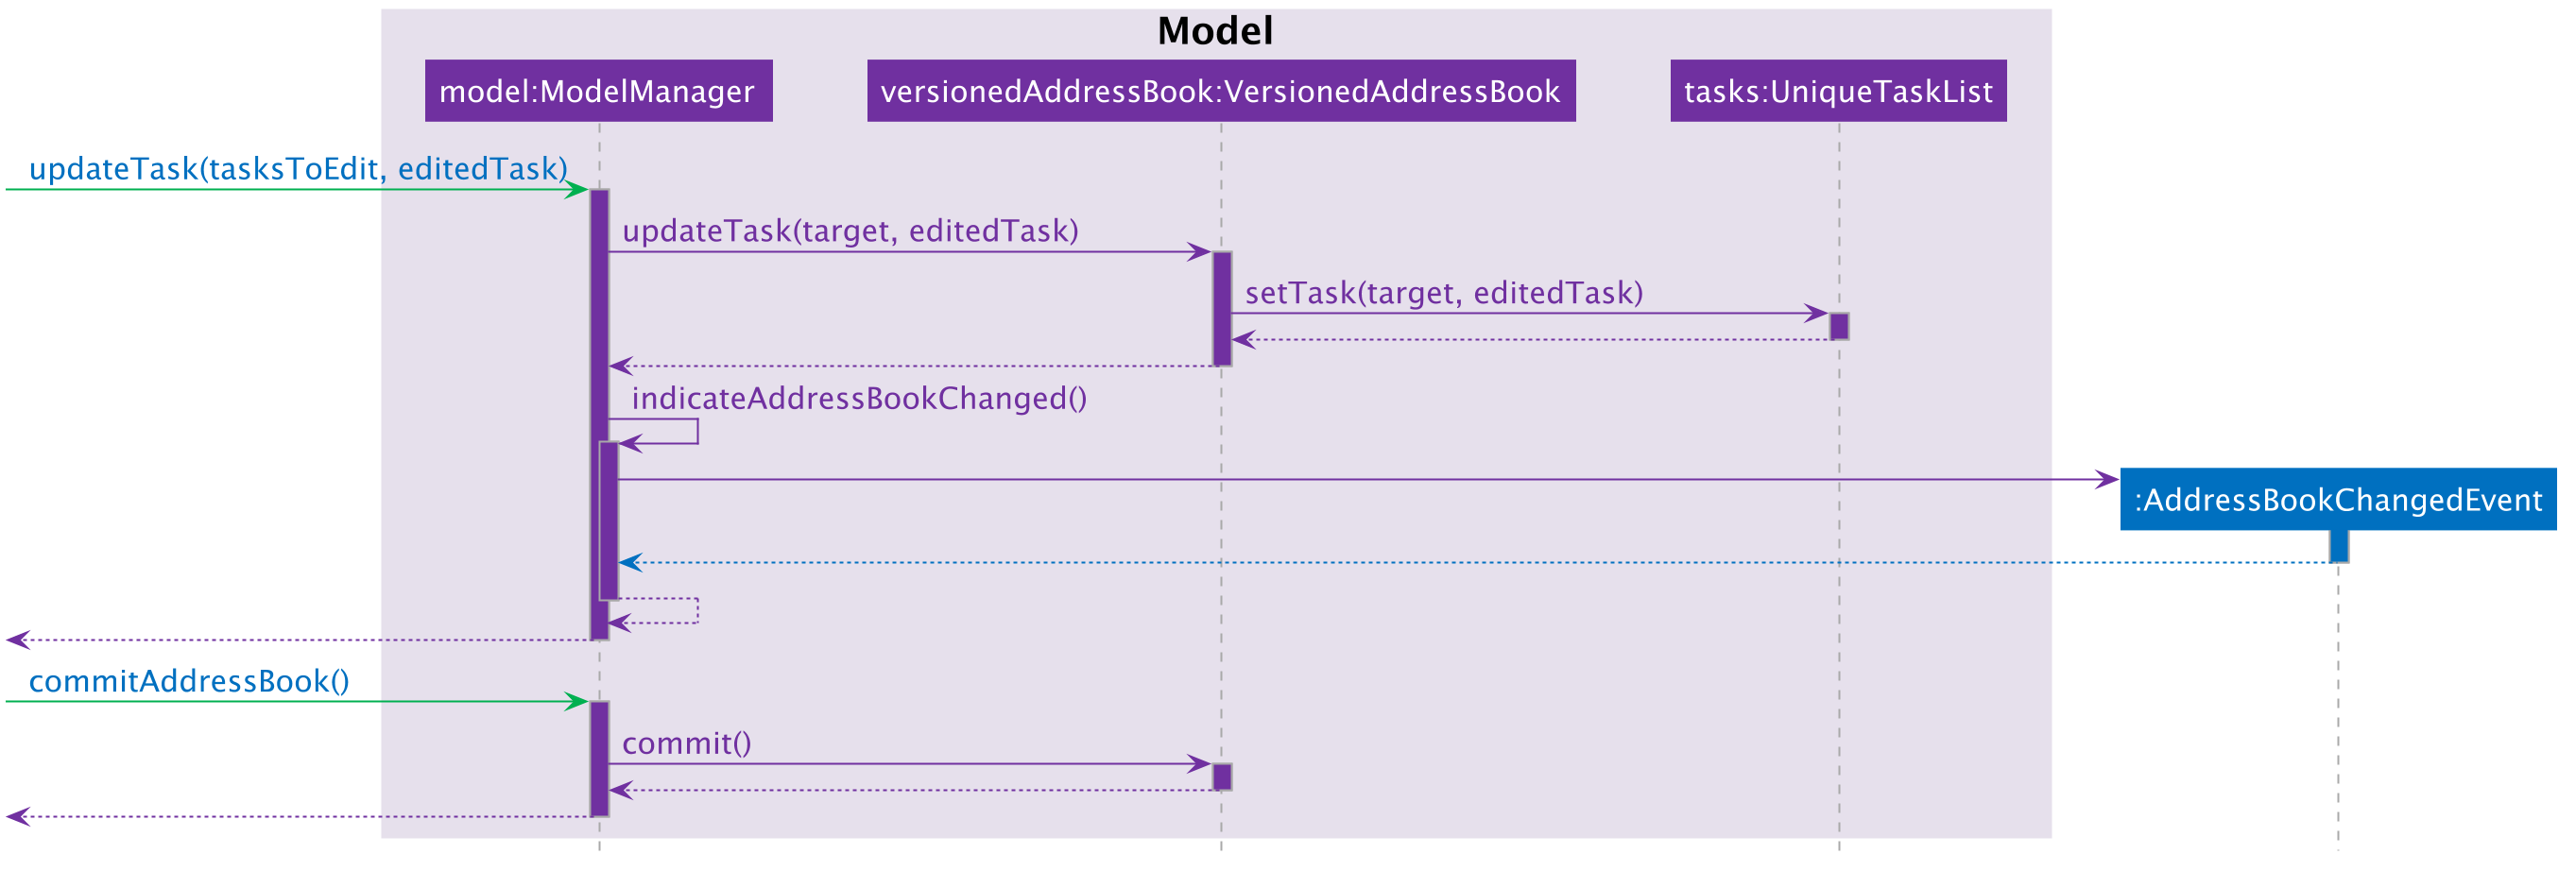
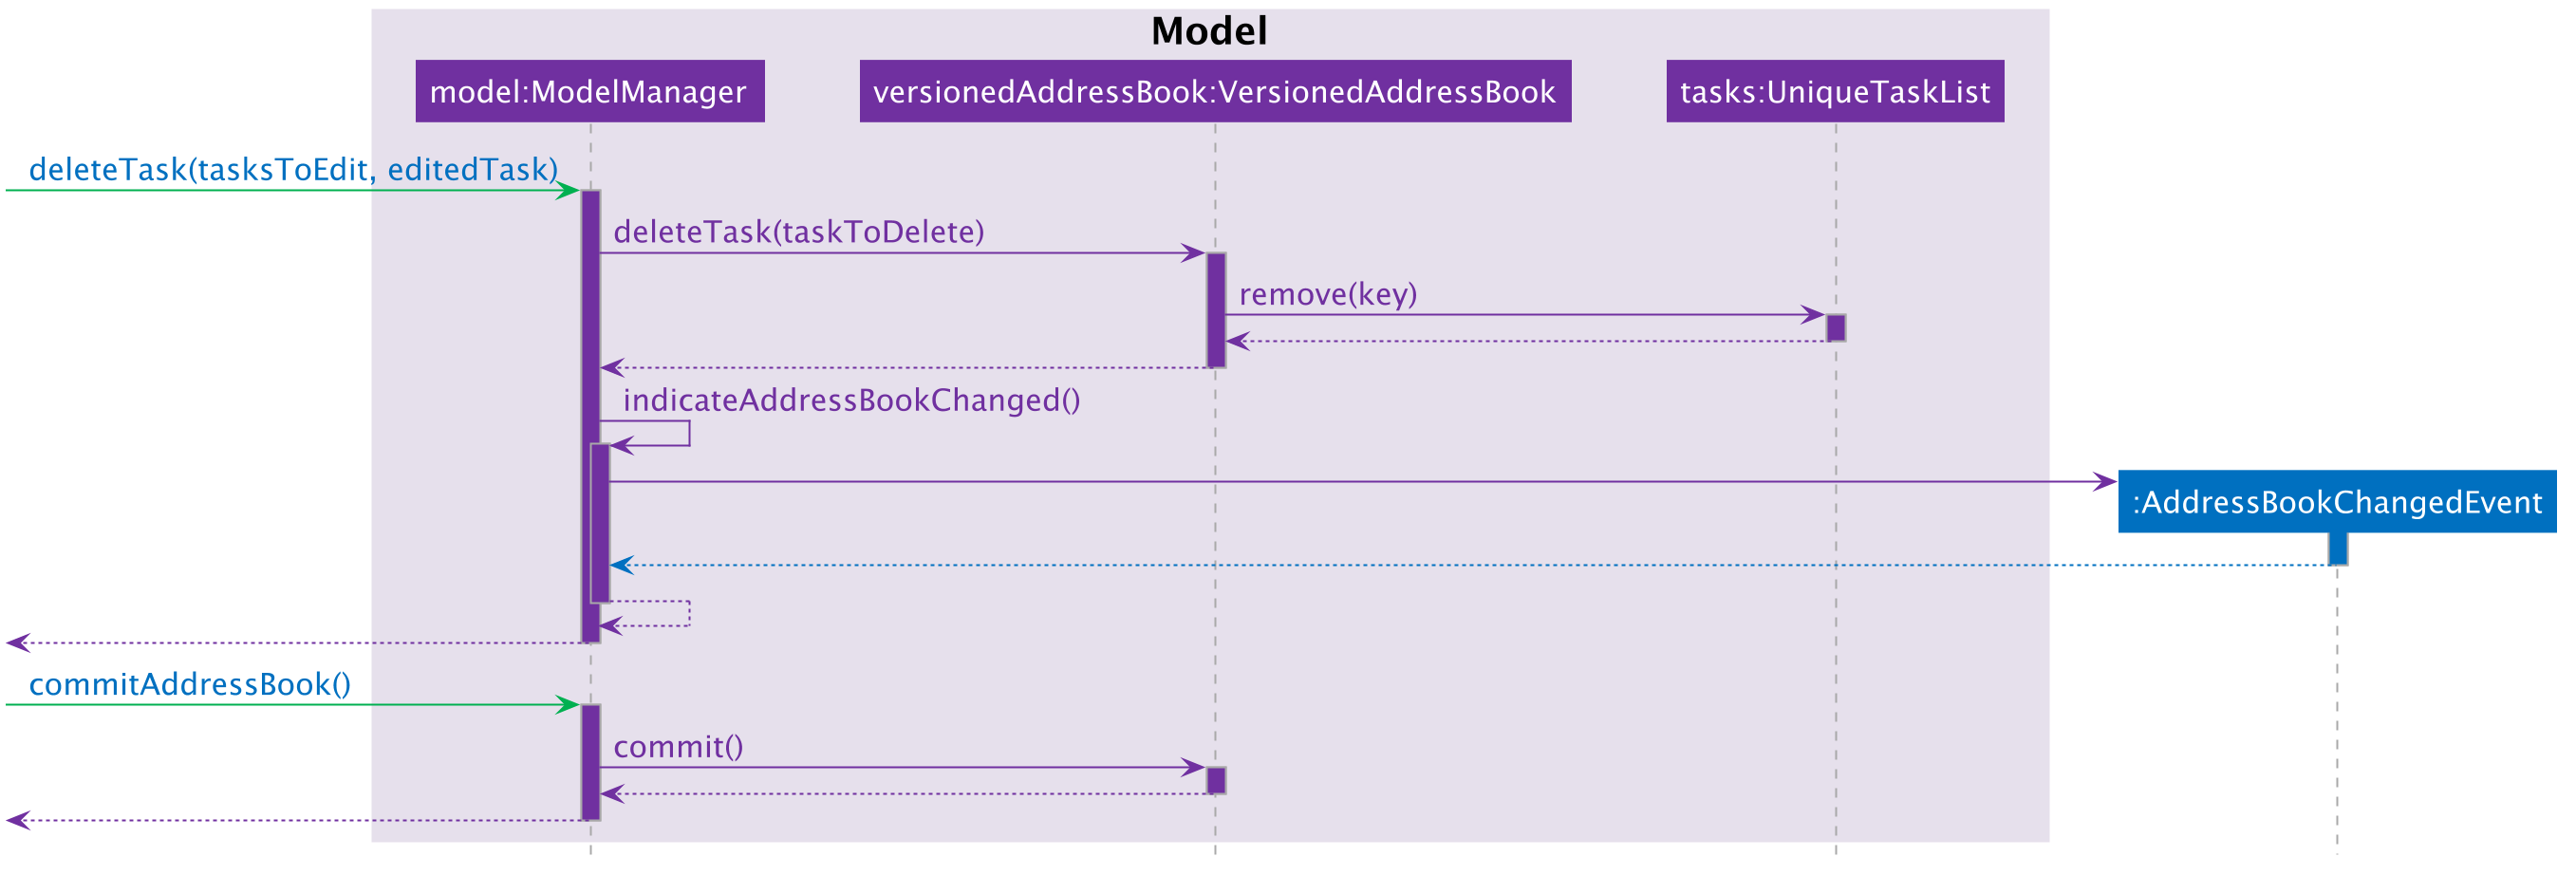
tasks edit Command in the Model ComponentPlease do note that DeleteCommand for Task is different from that of Person in that the former actually takes in a list of indices to be deleted, which is required to support batch deleting tasks. Changes are also made in DeleteCommandParser to add support for multiple indices user input, and to recognise the keyword "all". Should the keyword "all" be encountered, the list passed to DeleteCommand is null, which is a special value to indicate to DeleteCommand to delete all tasks in the current displayed list. You can find below the sequence diagram for batch-deleting task(s).
tasks delete Command in the Logic Component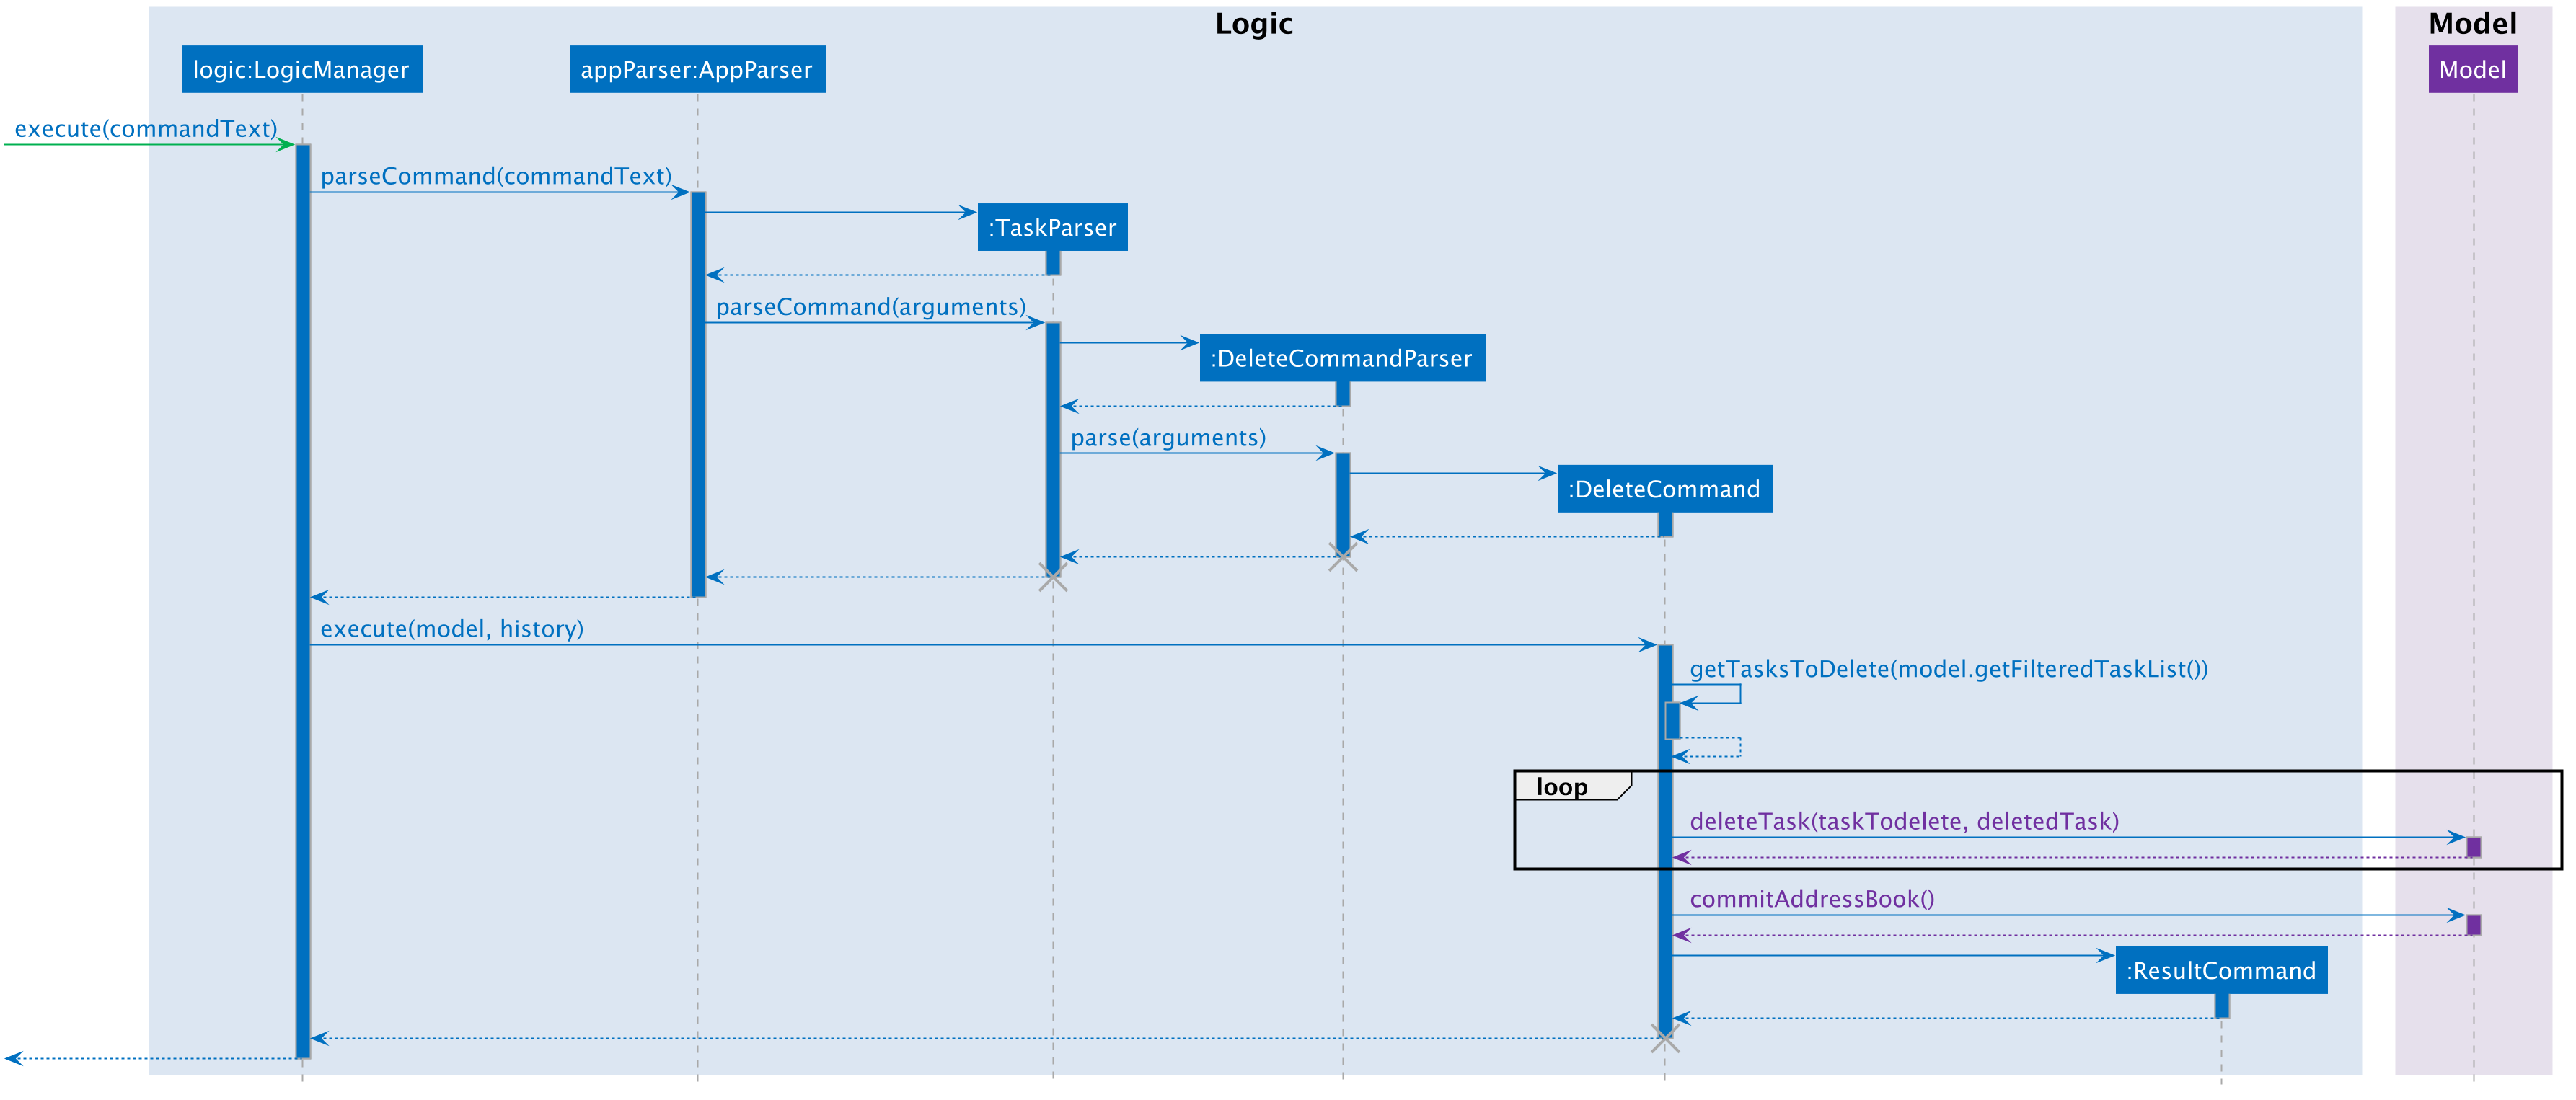
tasks delete Command in the Model Component
These diagrams are generated using PlantUML. The files used to generate the image files are stored inside docs/plantuml.
|
Note the AddressBookChangedEvent that is raised — this will notify StorageManager that there is a change in the AddressBook, and so to save to disk.
3.8.2. Future Enhancements
Currently, the methods void updateTask(Task target, Task editedTask) and void updatePerson(Person target, Person editedPerson) in the Model interface are very similar. Perhaps in the future Model can be refactored as a generic so that there is minimum code duplication.
3.9. Assigning and unassigning tasks and contacts
3.9.1. Current implementation
Tasks and contacts can be assigned to each other using the commands tasks assign and contacts assign, and unassigned by the tasks unassign and contacts unassign commands.
This many-to-many relationship is stored as a list of task IDs and person IDs in the Person and Task classes respectively. The IDs are UUIDs, chosen because they are guaranteed to be globally unique and are not dependent on the IDs of other tasks and persons. The IDs are generated randomly by the Person and Task classes if they are not provided to their respective constructors.
The commands are parsed by AssignCommandParser and UnassignCommandParser, which are used by both TasksParser and ContactsParser. Both parsers will execute their respective AssignCommand and UnassignCommand. If both the specified task and contact are found, the task and person IDs will be added to Person.taskIds and Task.personIds respectively, and the edited objects will be saved to disk. As happens when the edit commands are run, indicateAddressBookChanged() is called to update the UI. The data flow is similar to the one for EditCommand in the previous section.
The figure below is a sequence diagram that illustrates what happens when the user assigns a contact to a task. The process for assigning tasks to contacts and the unassign process are both very similar to this.
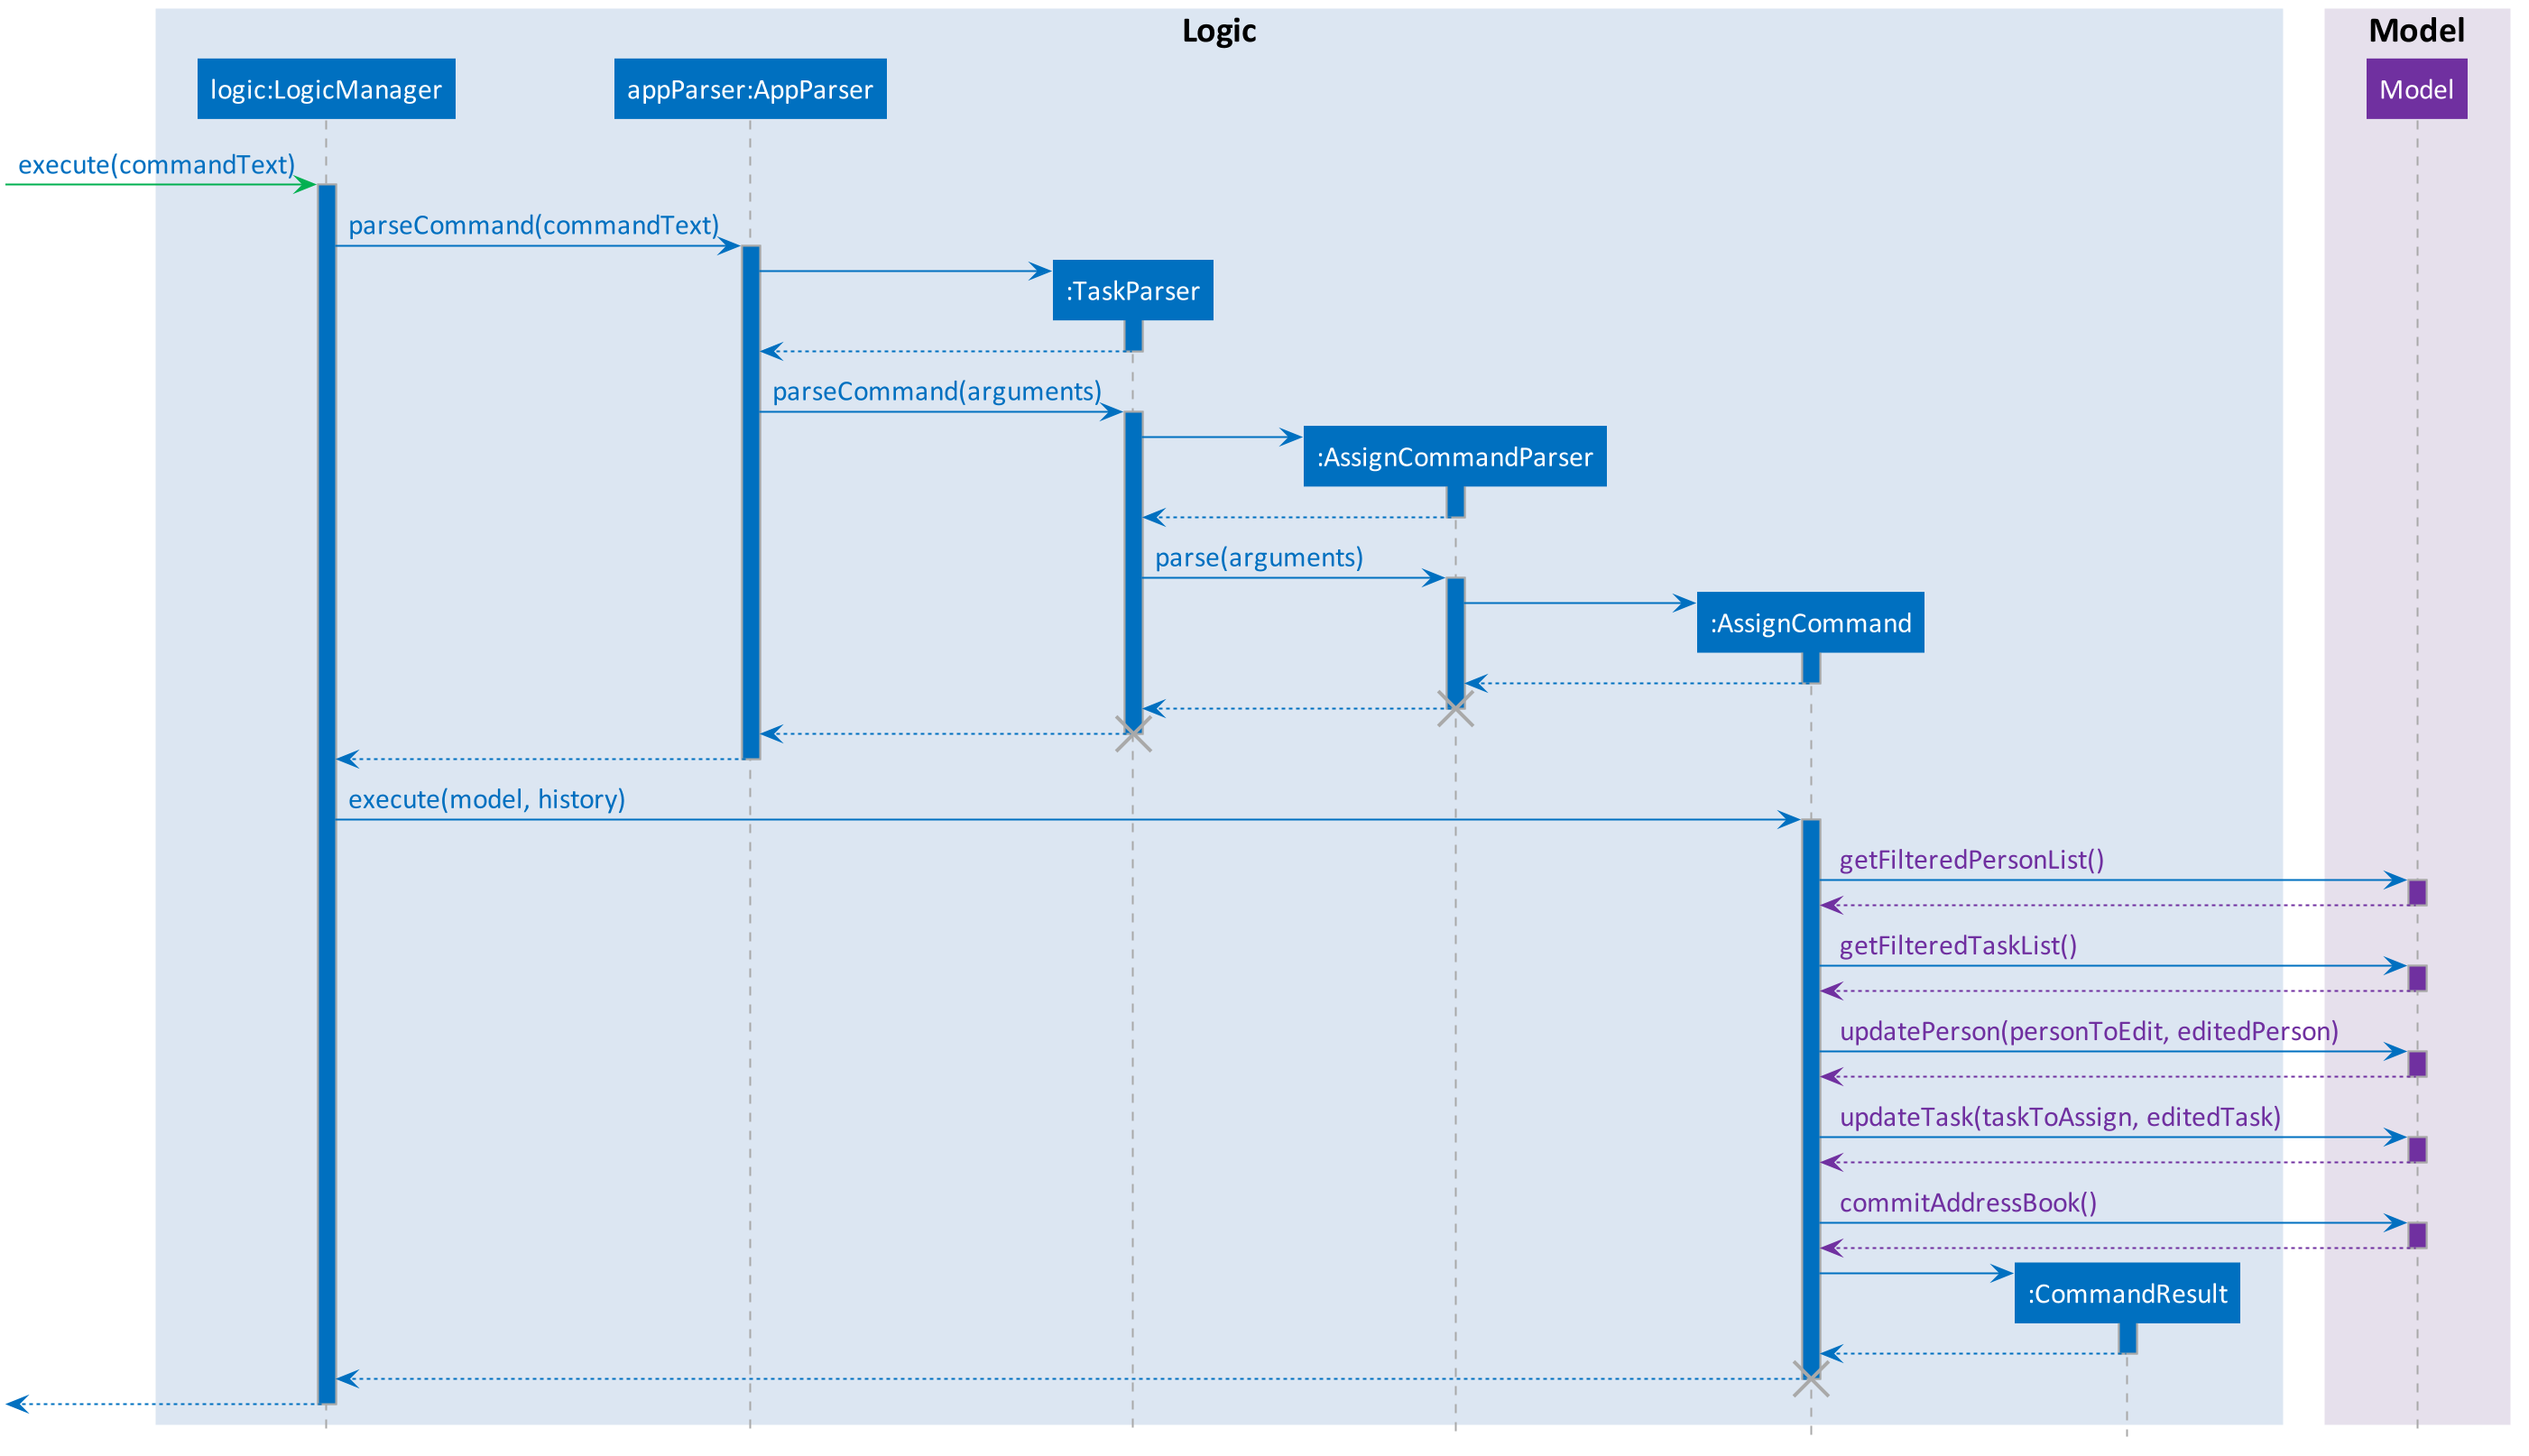
These diagrams are generated using PlantUML. The files used to generate the image files can be found in docs/diagrams/plantuml.
|
3.9.2. Error handling
AssignCommand will also throw errors if a user tries to assign a task to a contact when the contact has already been assigned. Although this is not strictly necessary as the IDs are stored in sets and it would have been impossible to assign someone twice, the error message assures the user that no double assignments will be made, and thus improves the user experience. Similarly, UnassignCommand throws errors if the user attempts to unassign a contact from a task when the contact is not assigned to it.
3.9.3. Alternative implementations considered
An alternative implementation that was considered was to model the many-to-many relationship using an Assignment class, which will act like a join table in relational databases. This would have slightly decoupled the Person and Task classes. However, we chose not to implement it this way as a Person will always be assigned to a Task, and also because implementing such a relationship with manually managed IDs is extremely complex without a relational database to abstract away the complexity.
3.9.4. Future Enhancements
Both AssignCommand and UnassignCommand have nearly identical implementations for both tasks and contacts. This is intentional, as this leaves room for the implementation of task or contact specific features. An example of such a possibility is an unassign all feature, e.g. contacts unassign c/3, which will be able to unassign contact 3 from all his tasks.
4. Documentation
We use asciidoc for writing documentation.
| We chose asciidoc over Markdown because asciidoc, although a bit more complex than Markdown, provides more flexibility in formatting. |
4.1. Editing Documentation
See UsingGradle.adoc to learn how to render .adoc files locally to preview the end result of your edits.
Alternatively, you can download the AsciiDoc plugin for IntelliJ, which allows you to preview the changes you have made to your .adoc files in real-time.
4.2. Publishing Documentation
See UsingTravis.adoc to learn how to deploy GitHub Pages using Travis.
4.3. Converting Documentation to PDF format
We use Google Chrome for converting documentation to PDF format, as Chrome’s PDF engine preserves hyperlinks used in webpages.
Here are the steps to convert the project documentation files to PDF format.
-
Follow the instructions in UsingGradle.adoc to convert the AsciiDoc files in the
docs/directory to HTML format. -
Go to your generated HTML files in the
build/docsfolder, right click on them and selectOpen with→Google Chrome. -
Within Chrome, click on the
Printoption in Chrome’s menu. -
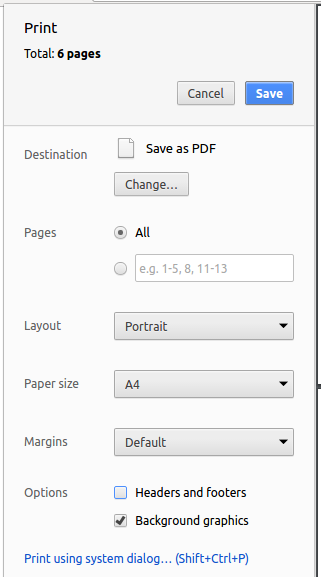
Set the destination to
Save as PDF, then clickSaveto save a copy of the file in PDF format. For best results, use the settings indicated in the screenshot below.
4.4. Site-wide Documentation Settings
The build.gradle file specifies some project-specific asciidoc attributes which affects how all documentation files within this project are rendered.
Attributes left unset in the build.gradle file will use their default value, if any.
|
| Attribute name | Description | Default value |
|---|---|---|
|
The name of the website. If set, the name will be displayed near the top of the page. |
not set |
|
URL to the site’s repository on GitHub. Setting this will add a "View on GitHub" link in the navigation bar. |
not set |
|
Define this attribute if the project is an official SE-EDU project. This will render the SE-EDU navigation bar at the top of the page, and add some SE-EDU-specific navigation items. |
not set |
4.5. Per-file Documentation Settings
Each .adoc file may also specify some file-specific asciidoc attributes which affects how the file is rendered.
Asciidoctor’s built-in attributes may be specified and used as well.
Attributes left unset in .adoc files will use their default value, if any.
|
| Attribute name | Description | Default value |
|---|---|---|
|
Site section that the document belongs to.
This will cause the associated item in the navigation bar to be highlighted.
One of: * Official SE-EDU projects only |
not set |
|
Set this attribute to remove the site navigation bar. |
not set |
4.6. Site Template
The files in docs/stylesheets are the CSS stylesheets of the site.
You can modify them to change some properties of the site’s design.
The files in docs/templates controls the rendering of .adoc files into HTML5.
These template files are written in a mixture of Ruby and Slim.
|
Modifying the template files in |
5. Testing
5.1. Running Tests
There are three ways to run tests.
| The most reliable way to run tests is the 3rd one. The first two methods might fail some GUI tests due to platform/resolution-specific idiosyncrasies. |
Method 1: Using IntelliJ JUnit test runner
-
To run all tests, right-click on the
src/test/javafolder and chooseRun 'All Tests' -
To run a subset of tests, you can right-click on a test package, test class, or a test and choose
Run 'ABC'
Method 2: Using Gradle
-
Open a console and run the command
gradlew clean allTests(Mac/Linux:./gradlew clean allTests)
| See UsingGradle.adoc for more info on how to run tests using Gradle. |
Method 3: Using Gradle (headless)
Thanks to the TestFX library we use, our GUI tests can be run in the headless mode. In the headless mode, GUI tests do not show up on the screen. That means the developer can do other things on the Computer while the tests are running.
To run tests in headless mode, open a console and run the command gradlew clean headless allTests (Mac/Linux: ./gradlew clean headless allTests)
5.2. Types of tests
We have two types of tests:
-
GUI Tests - These are tests involving the GUI. They include,
-
System Tests that test the entire App by simulating user actions on the GUI. These are in the
systemtestspackage. -
Unit tests that test the individual components. These are in
seedu.address.uipackage.
-
-
Non-GUI Tests - These are tests not involving the GUI. They include,
-
Unit tests targeting the lowest level methods/classes.
e.g.seedu.address.commons.StringUtilTest -
Integration tests that are checking the integration of multiple code units (those code units are assumed to be working).
e.g.seedu.address.storage.StorageManagerTest -
Hybrids of unit and integration tests. These test are checking multiple code units as well as how the are connected together.
e.g.seedu.address.logic.LogicManagerTest
-
5.3. Troubleshooting Testing
Problem: HelpWindowTest fails with a NullPointerException.
-
Reason: One of its dependencies,
HelpWindow.htmlinsrc/main/resources/docsis missing. -
Solution: Execute Gradle task
processResources.
6. Dev Ops
6.1. Build Automation
See UsingGradle.adoc to learn how to use Gradle for build automation.
6.2. Continuous Integration
We use Travis CI and AppVeyor to perform Continuous Integration on our projects. See UsingTravis.adoc and UsingAppVeyor.adoc for more details.
6.3. Coverage Reporting
We use Coveralls to track the code coverage of our projects. See UsingCoveralls.adoc for more details.
6.4. Documentation Previews
When a pull request has changes to asciidoc files, you can use Netlify to see a preview of how the HTML version of those asciidoc files will look like when the pull request is merged. See UsingNetlify.adoc for more details.
6.5. Making a Release
Here are the steps to create a new release.
-
Update the version number in
MainApp.java. -
Generate a JAR file using Gradle.
-
Tag the repo with the version number. e.g.
v0.1 -
Create a new release using GitHub and upload the JAR file you created.
6.6. Managing Dependencies
A project often depends on third-party libraries. For example, Address Book depends on the Jackson library for XML parsing. Managing these dependencies can be automated using Gradle. For example, Gradle can download the dependencies automatically, which is better than these alternatives.
a. Include those libraries in the repo (this bloats the repo size)
b. Require developers to download those libraries manually (this creates extra work for developers)
Appendix A: Product Scope
Target User: NUS Computing students doing group projects
Target user profile: - is a student managing a project with multiple team members - has a need to manage a significant number of contacts - has a need to manage a significant number of tasks - prefer desktop apps over other types - can type fast - prefers typing over mouse input - is reasonably comfortable using CLI apps
Value proposition: manage tasks faster than a typical mouse/GUI driven app
Appendix B: User Stories
Priorities: High (must have) - * * , Medium (nice to have) - ,
Low (unlikely to have) -
| Priority | As a… | I want to… | So that I can… |
|---|---|---|---|
|
user |
CRUD Tasks |
|
|
project manager |
assign other tasks to people |
track who’s supposed to complete them and notify them that they are supposed to complete the task |
|
project manager |
see the tasks assigned to each person |
know what they’re supposed to do |
|
project manager |
see an overview of all tasks and people assigned |
get a sense of the state of my project and tasks |
|
existing user |
search for people and tasks |
quickly find the person or task I watn |
|
existing user |
group tasks according to categories/tags |
manage a larger number of tasks easily |
|
existing user |
be alerted to tasks near their deadline |
complete tasks on time |
|
project manager |
send email notifications to people I assigned tasks to |
ensure they are on track with tasks |
|
user |
see milestones visualised using a calendar |
have a more chronological sense of my tasks |
|
user |
view team members’ calendars and share my own |
coordinate meetings and track progress |
|
user |
track the extent of others’ involvement in each task |
ensure fair distribution of credit |
|
user |
use this product as a web app |
easily access my tasks/work on all platforms |
|
user |
create recurring tasks |
avoid repeatedly creating a new task for each recurrence |
|
user |
have Autocomplete when typing tags |
find existing tags faster |
|
power user |
create command aliases |
enter commands more efficiently |
|
power user |
vim-mode CLI |
enter commands more efficiently |
|
power user |
emacs-mode CLI |
enter commands more efficiently |
Appendix C: Use cases
C.1. Create a contact
MSS
-
User requests to add a person, together with all the attributes.
-
Cow adds that person to the contacts.
Use case ends.
Extensions
-
1a. User provides an invalid attribute.
-
1a1. Cow shows an error message.
Use case ends.
-
C.2. List contacts
-
User requests to list persons.
-
Cow shows a list of persons.
Use case ends.
C.3. Update a contact
MSS
-
User requests to list persons.
-
Cow shows a list of persons.
-
User requests to update a specific person in the list, together with the new attributes.
-
Cow updates the person with the given attribute.
Use case ends.
Extensions
-
2a. The list is empty.
Use case ends.
-
3a. User provides an invalid index.
-
3a1. Cow shows an error message.
Use case resumes at step 2.
-
-
3a. User provides an invalid attribute.
-
3a1. Cow shows an error message.
Use case resumes at step 2.
-
C.4. Select a contact
MSS
-
User requests to list contacts.
-
Cow shows a list of contacts.
-
User requests to select a specific contact in the list.
-
Cow selects the contact.
Use case ends.
Extensions
-
2a. The list is empty.
Use case ends.
-
3a. User provides an invalid index.
-
3a1. Cow shows an error message.
Use case resumes at step 2
-
C.5. Delete a contact
MSS
-
User requests to list persons.
-
Cow shows a list of persons.
-
User requests to delete a specific person in the list.
-
Cow deletes the person.
Use case ends.
Extensions
-
2a. The list is empty.
Use case ends
-
3a. User provides an invalid index.
-
3a1. AddressBook shows an error message.
Use case resumes at step 2.
-
C.6. Create a task
MSS
-
User requests to add a task, together with all the attributes.
-
Cow adds that task.
Use case ends.
Extensions
-
1a. User provides an invalid attribute.
-
1a1. Cow shows an error message.
Use case ends.
-
C.7. List tasks
-
User requests to list tasks.
-
Cow shows a list of tasks.
Use case ends.
C.8. Edit a task
MSS
-
User requests to list tasks.
-
Cow shows a list of tasks.
-
User requests to edit a specific task in the list, together with the new attributes.
-
Cow edits the task with the given attribute.
Use case ends.
Extensions
-
2a. The list is empty.
Use case ends.
-
3a. User provides an invalid index.
-
3a1. Cow shows an error message.
Use case resumes at step 2.
-
-
3a. User provides an invalid attribute.
-
3a1. Cow shows an error message.
Use case resumes at step 2
-
C.9. Select a task
MSS
-
User requests to list tasks.
-
Cow shows a list of tasks.
-
User requests to select a specific task in the list.
-
Cow selects the task.
Use case ends.
Extensions
-
2a. The list is empty.
Use case ends
-
3a. User provides an invalid index.
-
3a1. Cow shows an error message.
Use case resumes at step 2.
-
C.10. Delete a task
MSS
-
User requests to list tasks.
-
Cow shows a list of tasks.
-
User requests to delete a specific task in the list.
-
Cow deletes the task.
Use case ends.
Extensions
-
2a. The list is empty.
Use case ends
-
3a. User provides an invalid index.
-
3a1. Cow shows an error message.
Use case resumes at step 2
-
C.11. Batch delete tasks
MSS
-
User requests to list tasks.
-
Cow shows a list of tasks.
-
User requests to delete a number of tasks in the list.
-
Cow deletes the specified tasks.
Use case ends.
Extensions
-
2a. The list is empty.
Use case ends.
-
3a. User provides a list of indices containing an invalid index.
-
3a1. Cow shows an error message. Use case resumes at step 2
-
C.12. Delete all tasks
MSS
-
User requests to list tasks.
-
Cow shows a list of tasks.
-
User requests to delete all tasks in the list.
-
Cow deletes all tasks in the list.
C.13. Assign people to a task
MSS
-
User requests to list people.
-
Cow shows a list of people.
-
User requests to list tasks.
-
Cow shows a list of tasks.
-
User requests to assign a person to a task.
-
Cow assigns the person to the task.
Use case ends
Extensions
-
2a. The list is empty.
Use case ends.
-
4a. The list is empty.
Use case ends.
-
5a. User provides an invalid person or task index.
-
5a1. Cow shows an error message.
Use case ends.
-
-
5b. User requests to assign a person already assigned to the task.
-
5b1. Cow shows a message telling the user the person is already assigned.
Use case ends.
-
C.14. Unassign person from a task
MSS
-
User searches for a contact.
-
Cow displays the contact.
-
User requests to view tasks assigned to the contact.
-
Cow displays a list of tasks assigned to the contact.
-
User requests to unassign a contact from a task.
-
Cow unassigns the contact from the task.
Use case ends
Extensions
-
2a. The list is empty.
Use case ends.
-
4a. The list is empty.
Use case ends.
-
5a. User provides an invalid person or task index.
-
5a1. Cow shows an error message.
Use case ends.
-
-
5b. User requests to unassign a person that is not assigned to the task.
-
5b1. Cow shows a message telling the user the person is not assigned.
Use case ends.
-
C.15. View calendar
MSS
-
User requests to display calendar for specified month and year.
-
Cow displays the specified month and year in the calendar panel populated with tasks based on task end date.
Use case ends
C.16. List calendars
MSS
-
User requests to list calendars.
-
Cow displays list of all calendars I have access to, including shared calendars.
Use case ends
C.17. Import calendar
MSS
-
User requests to import calendar XML file and specifies calendar name.
-
Cow imports tasks contained in XML file into the a calendar with the specified name.
Use case ends
Extensions
-
2a. A calendar already exists with the specified name.
-
2a1. Cow notifies the user and merges the incoming calendar with the pre-existing calendar.
Use case ends.
-
C.18. Share calendar
MSS
-
User requests to share his calendar.
-
Cow exports an XML file containing all current existing tasks to the specified path.
Use case ends
Appendix D: Non-Functional Requirements
-
Disability friendly
-
colour scheme
-
compatibility with screen readers
-
on-screen keyboard
-
-
Infinitely scalable (serverless back end on AWS Lambda-equivalent)
-
Support alternative (better, faster) forms of storage
-
Should work on any mainstream OS as long as it has Java 9 or higher installed.
-
Advanced analytics on tasks for work efficiency insights
-
Remove all N+1 queries and O(n) lookups
Appendix E: Glossary
-
Mainstream OS
-
Windows, Linux, Unix, OS-X
-
-
Tasks
-
Text describing work to be done, may be attached to one or more contacts
-
-
Alternative storage
-
Local/Remote databases
-
-
Contact
-
Represents a person, with name, email, etc.
-
Appendix F: Product survey
-
GitHub/GitLab/Bitbucket Issues
-
Bugzilla
-
Jira
-
Launchpad
-
Asana
-
Trello
-
Pen and paper
-
Email
-
Orgmode
Appendix G: Instructions for Manual Testing
Given below are instructions to test the app manually.
G.1. Launch and Shutdown
-
Initial launch
-
Download the jar file and copy into an empty folder
-
Double-click the jar file
Expected: Shows the GUI with a set of sample contacts and tasks. The window size should be optimum if your screen’s resolution is at least 1920x1080.
-
-
Saving window preferences
-
In case window size is not optimum, resize the window to an optimum size. Move the window to a different location. Close the window.
-
Re-launch the app by double-clicking the jar file.
Expected: The most recent window size and location is retained.
-
-
Closing the application
-
Test case:
exitExpected: the application should exit and the window should disappear.
-
G.2. Adding Tasks
-
Adding a task while all tasks are listed
-
Prerequisites: List all tasks using the
tasks listcommand. There can be any number of tasks in the list. -
Test case:
tasks add n/Brush the cows sd/20180101 st/0000 ed/20181231 et/2359 t/ChillExpected: A new task with the fields entered is added to the bottom of the task list. -
Test case:
tasks add n/Slaughter the cows ed/20190101 et/1200Expected: A new task with the entered name and end date and time is added with the current date and time as the start date and time. -
Test case:
tasks add n/Feed the cows sd/20180101 st/2359 ed/20180101 et/0000Expected: No task is added. An error message is shown. -
Test case:
tasks add n/Feed the cows ed/19700101 et/0000Expected: No task is added. An error message is shown. -
Test case:
tasks add n/Feed the cows sd/20180101 st/0000 ed/20180231 et/2500Expected: No task is added. An error message is shown. -
Other incorrect tasks add commands to try: Names containing non-alphanumeric characters, dates that don’t exist on the calendar, times outside the range 0000-2359 inclusive, wrongly formatted dates and times.
-
G.3. Editing Tasks
-
Editing a task while all tasks are listed
-
Prerequisites: List all tasks using the
tasks listcommand. There are at least 4 tasks in the list. -
Test case:
tasks edit 1 n/Slaughter the cow
Expected: First task is edited such that its name is nowSlaughter the cow. New details of the edited task are shown in the status message. Timestamp in the status bar is updated. -
Test case:
tasks edit 1 sd/20180101 st/0000 ed/20180101 et/2359
Expected: First task is edited such that its start date and time are 1 January 2018, 00.00am and its end date and time are 1 January 2018, 23.59pm. New details of the edited task are shown in the status message. Timestamp in the status bar is updated. -
Test case:
tasks edit 1 t/
Expected: First task is cleared of any tags that it might have had. New details of the edited task are shown in the status message. Timestamp in the status bar is updated. -
Test case:
tasks edit 1 t/messy
Expected: First task’s tag is now onlymessy. New details of the edited task are shown in the status message. Timestamp in the status bar is updated. -
Test case:
tasks edit 1 t/messy t/mean
Expected: First task’s tags are nowmeanandmessy. They are shown in no particular order. New details of the edited task are shown in the status message. Timestamp in the status bar is updated. -
Other correct tasks edit command to try: Combining editing name with start and/or end date and time and/or tags, Editing only start date and time as long as they are before the end date and time.
-
Test case:
tasks edit 0 n/Slaughter the cow
Expected: No task is edited. Error detail is shown in the status message. Status bar remains the same. -
Test case:
tasks edit 1 sd/20181231 st/0000 ed/20180101 et/2359
Expected: No task is edited. Error detail is shown in the status message. Status bar remains the same. -
Test case:
tasks edit 1
Expected: No task is edited. Error detail is shown in the status message. Status bar remains the same. -
Other incorrect tasks edit command to try:
tasks edit,tasks edit x(where x is negative or larger than the list size), Editing with invalid start and/or date and/or time, Editing with non-alphanumeric characters in the task name.
-
G.4. Deleting Task(s)
-
Deleting a task while all tasks are listed
-
Prerequisites: List all tasks using the
tasks listcommand. There are at least 4 tasks in the list. -
Test case:
tasks delete 1
Expected: First task is deleted from the task list. Details of the deleted task are shown in the status message. Timestamp in the status bar is updated. -
Test case:
tasks delete 0
Expected: No task is deleted. Error detail is shown in the status message. Status bar remains the same. -
Other incorrect tasks delete command to try:
tasks delete,tasks delete x(where x is negative or larger than the list size)
-
-
Deleting multiple tasks while all tasks are listed
-
Prerequisites: List all tasks using the
tasks listcommand. There are at least 4 tasks in the list. -
Test case:
tasks delete 1 3 2
Expected: First, second and third tasks are deleted from the task list. Details of the deleted tasks are shown in the status message. Timestamp in the status bar is updated. -
Test case:
tasks delete 1 4 0
Expected: No task is deleted. Error detail is shown in the status message. Status bar remains the same. -
Other incorrect tasks delete command to try:
tasks delete 1 2 x(where x is negative or larger than the list size)
-
-
Deleting all tasks shown in the task list
-
Prerequisites: List all tasks using the
tasks listcommand. There are at least 1 task. -
Test case:
tasks delete all
Expected: All tasks shown in the task list are deleted. Details of the deleted tasks are shown in the status message. Timestamp in the status bar is updated.
-
G.5. Filtering tasks
-
Searching for tasks
-
Prerequisites: There are multiple tasks in the list for visible results.
-
Test case:
tasks find n/work
Expected: Any tasks withworkin the name are listed in the tasks list panel. Number of tasks listed is shown in the status message. -
Test case:
tasks find t/farm
Expected: Any tasks with thefarmtag are listed in the tasks list panel. Number of tasks listed is shown in the status message. -
Test case:
tasks find sd/20180105
Expected: Any tasks that starts at20180105are listed in the tasks list panel. Number of tasks listed is shown in the status message. -
Test case:
tasks find n/hello sd/20181103
Expected: Any tasks withhelloin the name and start date20181103are listed in the tasks list panel. Number of tasks listed is shown in the status message. -
Test case:
tasks find t/
Expected: Task list is not changed. Error details is shown in the status message. -
Other incorrect commands to try:
tasks find n/,tasks find sd/invaliddate,tasks find ed/
Expected: Similar to previous.
-
G.6. Calendar Show
|
Tasks with long names will be truncated in the calendar. If there are more than 5 tasks ending on that day, the cell will be scrollable, but a scroll bar is not displayed due to space constraints. |
-
Calendar show command displays specified month in calendar.
-
Test case:
calendar show y/2018 m/1
Expected: Calendar header changes to "January 2018". Days of the week should be correctly displayed.
-
-
Calendar displays tasks ending in specified month.
-
Pre-requisites:
-
List all tasks using the
tasks listcommand. -
Display calendar for January 2018 using the
calendar show y/2018 m/1command.
-
-
Test case:
tasks add n/test calendar show sd/20170101 ed/20180115 et/1200
Expected: Cell corresponding to 15 Jan 2018 contains the entry displaying "test calendar show".
-
-
Calendar displays multiple tasks due on the same day
-
Pre-requisites: List all tasks using the
tasks listcommand. -
Enter the
tasks add n/test calendar multiple sd/20170101 ed/20181212 et/1200command 3 times. -
Enter the
calendar show y/2018 m/12command.
Expected: Cell corresponding to 12 December 2018 has multiple entries displaying "test calendar multiple".
-
-
Calendar displays adjacent months correctly.
-
Pre-requisites:
-
List all tasks using the
tasks listcommand. -
Display calendar for December 2018 using the
calendar show y/2018 m/12command.
-
-
Test case:
tasks add n/test calendar previous month sd/20170101 ed/20181127 et/1200.
Expected: Cell corresponding to 27 November 2018 has one new entry displaying "test calendar previous month". -
Test case:
tasks add n/test calendar following month sd/20170101 ed/20190102 et/1200
Expected: Cell corresponding to 2 Jan 2019 has one new entry displaying "test calendar following month".
-
-
Default displayed calendar on app startup.
-
Create task ending in the current month.
-
Shut down the app
-
Launch the app
Expected: Calendar displays the current month. Calendar should be populated with tasks ending in the current month.
-
-
User input is validated.
-
Test cases:
-
calendar show y/0 m/12 -
calendar show y/10000 m/12 -
calendar show y/2018 m/0 -
calendar show y/2018 m/13
-
Expected: Calendar is unchanged. Error details shown in the status message.
-
G.7. Assigning a Task to a Contact
-
Assigning a task to a contact and vice versa while some or all tasks and contacts are listed.
-
Prerequisites: List tasks using the
tasks listortasks findcommands, and list contacts using thecontacts listorcontacts findcommands. There must be at least 1 task and 2 contacts on screen. -
Test case:
tasks assign c/1 k/1
Expected: First task is assigned to the first contact. Details of the assignment are shown in the status message. Timestamp in the status bar is updated. -
Test case:
tasks assign c/1 k/1
Expected: No assignment is made. Error detail is shown in the status message. Status bar remains the same. -
Test case:
contacts assign c/1 k/1
Expected: No assignment is made. Error detail is shown in the status message. Status bar remains the same. -
Test case:
contacts assign c/2 k/1
Expected: Second contact is assigned to the first task. Details of the assignment are shown in the status message. Timestamp in the status bar is updated. -
Test case:
contacts assign c/2 k/1
Expected: No assignment is made. Error detail is shown in the status message. Status bar remains the same. -
Test case:
tasks assign c/2 k/1
Expected: No assignment is made. Error detail is shown in the status message. Status bar remains the same. -
Other incorrect assign commands to try:
tasks assignorcontacts assign,tasks assign c/xorcontacts assign c/x(where x is any integer),tasks assign k/xorcontacts assign k/x(where x in any integer),tasks assign c/x k/yorcontacts assign c/x k/y(where x is negative or larger than the contacts list size and/or y is negative or larger than the task list size).
-
G.8. Unassigning a Task from a Contact
-
Unassigning a task from a contact and vice versa while some or all tasks and contacts are listed.
-
Prerequisites: List tasks using the
tasks listortasks findcommands, and list contacts using thecontacts listorcontacts findcommands. There must be at least 1 task and 2 contacts on screen. Task 1 must be assigned to contacts 1 and 2, as detailed in the previous test case. -
Test case:
tasks unassign c/1 k/1
Expected: First task is unassigned from the first contact. Details of the unassignment are shown in the status message. Timestamp in the status bar is updated. -
Test case:
tasks unassign c/1 k/1
Expected: No unassignment is made. Error detail is shown in the status message. Status bar remains the same. -
Test case:
contacts unassign c/1 k/1
Expected: No unassignment is made. Error detail is shown in the status message. Status bar remains the same. -
Test case:
contacts unassign c/2 k/1
Expected: Second contact is unassigned from the first task. Details of the unassignment are shown in the status message. Timestamp in the status bar is updated. -
Test case:
contacts unassign c/2 k/1
Expected: No unassignment is made. Error detail is shown in the status message. Status bar remains the same. -
Test case:
tasks unassign c/2 k/1
Expected: No unassignment is made. Error detail is shown in the status message. Status bar remains the same. -
Other incorrect unassign commands to try:
tasks unassignorcontacts unassign,tasks unassign c/xorcontacts unassign c/x(where x is any integer),tasks unassign k/xorcontacts unassign k/x(where x in any integer),tasks unassign c/x k/yorcontacts unassign c/x k/y(where x is negative or larger than the contacts list size and/or y is negative or larger than the task list size).
-